Working with containers
From Tubetracker
(Redirected from Managing storage containers)
- In tube.tracker, container is the term used to represent a object in which racks are stored. For example, each refrigeration unit or storage rack is its own container. Over time, containers may be added to or removed from a facility. They may also simply be renamed or repurposed. The Container Maintenance Screen allows for all of these occurrences.
Contents
Opening the Container Maintenance Screen
- Click on Containers in the Navigation Menu under Maintenance.
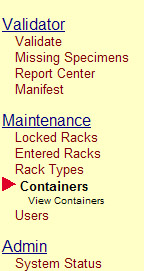 Navigation Menu
Maintenance > Containers - The Container Maintenance Screen will appear.
 Manage containers main screen


- The Container Maintenance Screen is divided into three sections.
- Active Containers: Displays all containers that are available for rack storage.
- Inactive Containers: Displays all containers marked as inactive that are not available for rack storage.
- Add New Container: Allows for new containers to be created.
Add New Container
When a container is added to a facility, it must also be added in tube.tracker so that racks can be stored in it. The Add New Container section is located below the Active Containers and Inactive Containers.
Add new container
- Enter the information for the new container into the corresponding boxes as described below:
- ID: A unique series of letters and numbers used to identify the container. In the example above, LOCKERA is used as the ID for Storage Locker A. The best choice for a Container ID is one that is short, descriptive, and uses standard abbreviations. Subsequent, similar containers with names Storage Locker B and Storage Locker C would then have the IDs LOCKERB and LOCKERC.
- Name: A descriptive name for the container. This is the label for this container that users will see when looking at a list of containers or, for example, when selecting a container in which a rack or specimen will be added. Just like a Container ID, a Container Name should also be follow a naming standard and it should be relatively short. It is more important that the name be descriptive and recognizable than overly abbreviated. In the example above, Storage Locker A is the name that is used. Subsequent, similar containers would have the names Storage Locker B, Storage Locker C, etc.
- Expire Time: The number of days racks of specimens will remain active when stored in this container after which they will be marked as expired. In the example above, a temporary storage locker is used and so racks are expected to be stored in this container for only one day. Note: Using an Expire Time of 0 days will result in racks expiring immediately when being added to this container.
- Size: The maximum number of racks the container can hold at a given time. If the container holds only one size of rack, then the maximum number of racks of that size can be dictated here. If, however, the container will hold racks of many different sizes, it may be impossible to know how many racks the container can hold as it will vary depending on the rack size. If this is the case or for any other reason there is no desire to specify a capacity, enter 0 as the size to remove capacity restrictions.
- Add Note: A note for the container can be added by clicking the Add Note check box and typing the note into the text box that appears.
- Click the Add New Container button to create the new container as specified. The Container Maintenance Screen will refresh and the new container will be displayed in the Active Containers section.
Deactivate a Container
- If a container is no longer being used, it may be deactivated so that tube.tracker users will no longer be able to work with it.
- Locate the container to be deactivated in the Active Containers section.
- Click the Deactivate button corresponding to that container. The container will be deactivated and will now be listed in the Inactive Containers section. Users will no longer be able to work with that container unless it is reactivated.
Reactivate an Inactive Container
- If a container was previously marked as inactive so that tube.tracker users could no longer work with it but it once again will need to be used, it can be reactivated to allow users to work with it again.
- Locate the container to be reactivated in the Inactive Containers section.
- Click the Activate button corresponding to the container. The container will be reactivated and will now be listed in the Active Containers section. Users will now be able to work with that container once again.
Edit a Container
After a container as been added to tube.tracker, it's properties can still be changed.
- Locate the container that's properties will be changed in the Active Containers section.
- Click the Edit button corresponding to the container.
- The Container Editing Screen will appear.
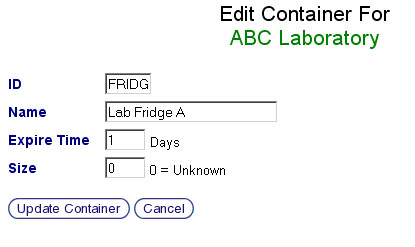 Edit container
 - Change the details of the container as desired. Refer to the Add a New Container section for guidelines.
- Click the Update Container button to save the changes or click the Cancel button to return to the Container Maintenance Screen.

Back to the Online Documentation