Difference between revisions of "Adding racks of specimens"
| Line 22: | Line 22: | ||
== Specimen Adding Screens == | == Specimen Adding Screens == | ||
| − | The Bulk and Conventional Specimen Adding Screens contain many of the same characteristics | + | === Overview === |
| + | |||
| + | The Bulk and Conventional Specimen Adding Screens contain many of the same characteristics including a Header, Graphical Rack Representation & Specimen Data Entry Section. | ||
<table><tr><td>[[image:Bulk_Specimen_Entry.jpg|none|frame|'''Bulk Specimen Entry Screen''']]</td><td>[[image:Conventional_Specimen_Entry.jpg|none|frame|'''Conventional Specimen Entry Screen''']]</td></tr></table><br/> | <table><tr><td>[[image:Bulk_Specimen_Entry.jpg|none|frame|'''Bulk Specimen Entry Screen''']]</td><td>[[image:Conventional_Specimen_Entry.jpg|none|frame|'''Conventional Specimen Entry Screen''']]</td></tr></table><br/> | ||
| + | |||
| + | |||
| + | === Header === | ||
| + | |||
At the top of both specimens adding screens are the current entry method in black text, followed by the Rack ID and Destination Container on the line below in green text. <table><tr><td>[[image:Bulk_add_top_lines.jpg|none|frame|'''Bulk Specimen Entry Screen<br/>Header''']]</td><td>[[image:conventional_add_top_lines.jpg|none|frame|'''Conventional Specimen Entry Screen<br/>Header''']]</td></tr></table><br/> | At the top of both specimens adding screens are the current entry method in black text, followed by the Rack ID and Destination Container on the line below in green text. <table><tr><td>[[image:Bulk_add_top_lines.jpg|none|frame|'''Bulk Specimen Entry Screen<br/>Header''']]</td><td>[[image:conventional_add_top_lines.jpg|none|frame|'''Conventional Specimen Entry Screen<br/>Header''']]</td></tr></table><br/> | ||
| − | Below the page header and on the left side of the screen is the graphical representation of the selected rack shown as either a blue grid for a rack or a list for a dimensionless rack. In the example shown below, a 6x12 rack is displayed on the left and a dimensionless rack is displayed on the right. | + | |
| + | |||
| + | === Graphical Rack Representation === | ||
| + | |||
| + | Below the page header and on the left side of the screen is the graphical representation of the selected rack shown as either a blue grid for a two-dimensional rack or a list for a dimensionless rack. In the example shown below, a 6x12 rack is displayed on the left and a dimensionless rack is displayed on the right. | ||
<gallery caption="Graphical rack representations" widths="242px" heights="280px" perrow="2"> | <gallery caption="Graphical rack representations" widths="242px" heights="280px" perrow="2"> | ||
Image:bulk_add_rack_graphic2.jpg|'''Two Dimensional Rack''' | Image:bulk_add_rack_graphic2.jpg|'''Two Dimensional Rack''' | ||
Image:bulk_add_rack_dimensionless_graphic.jpg|'''Dimensionless Rack''' | Image:bulk_add_rack_dimensionless_graphic.jpg|'''Dimensionless Rack''' | ||
</gallery><br/> | </gallery><br/> | ||
| − | + | For two-dimensional racks, the columns and rows are labeled such that each position in the rack can be identified using two numbers or a letter and a number depending on the institution's settings. Position 2-3 (or B-3) refers to the second column from the left and the third row from the bottom. Column numbers (or letters) increase from left to right and row numbers increase from bottom to top. | |
Each square in this grid represents either a specimen or an open space where a specimen can be stored. It is color coded as such: | Each square in this grid represents either a specimen or an open space where a specimen can be stored. It is color coded as such: | ||
| − | + | * The <span style="color: #000080;">'''Blue'''</span> square (1-7 in the two dimensional rack example below) indicates the position where the next specimen will be input. By default, it will start in position 1-1 (or A-1) and will increment one row every time a specimen tube is scanned. | |
| − | + | * <span style="color: #FFFFFF; background-color: #000000;">'''White'''</span> squares denote open positions on the rack that can accept a new specimen or remain empty. | |
| − | + | * <span style="color: #FF0000">'''Red'''</span> circles indicate previously scanned specimens that have been saved successfully. If the red circle surrounds a black N then there is a note for that specimen. | |
| − | + | * <span style="color: #008000">'''Green'''</span> circles represent specimens that have been added but not saved. They appear only when using the Bulk Add Specimens Method since the Conventional Add Specimens Method saves the rack after each specimen is entered. | |
| − | + | * Reveal the Specimen ID of a specimen by holding the mouse pointer over a specimen. This is quick and easy method of verifying previously scanned specimens. | |
| + | [[Image:bulk_add_rack_graphic2.jpg|none|frame|'''Two Dimensional Rack''']] | ||
| − | |||
| − | |||
| − | |||
| − | |||
| − | + | === Specimen Data Entry === | |
| − | + | The specimen data entry portion of the screen displays the details of the entry process and provides the ability to enter new Specimen IDs.[[image:bulk_add_spec_info.jpg|none|frame|'''Specimen data entry portion''']]<br clear="all" /> | |
* '''Last ID Entered''': Displays the most recently entered specimen's Specimen ID and Rack Position. If no specimens have been entered yet, this line will display N/A. | * '''Last ID Entered''': Displays the most recently entered specimen's Specimen ID and Rack Position. If no specimens have been entered yet, this line will display N/A. | ||
| − | * '''Current Position''': Indicates the position in the rack where the next specimen will be entered. This corresponds to the blue box in the | + | * '''Current Position''': Indicates the position in the rack where the next specimen will be entered. This corresponds to the blue box in the Graphical Rack Representation. The Current Position can be changed at any time by clicking on a new position in the grid. |
* '''Add Note''' check box: Marks the specimen as having a note and will then display a text box where a note can be entered just below the Specimen ID text box. | * '''Add Note''' check box: Marks the specimen as having a note and will then display a text box where a note can be entered just below the Specimen ID text box. | ||
| − | * '''Specimen ID''' text box: Provides the space to | + | * '''Specimen ID''' text box: Provides the space to type or scan in the current Specimen ID. |
== Bulk Add Method == | == Bulk Add Method == | ||
| − | + | Adding a specimen: | |
# Ensure that the current position (represented by the blue square) matches the position of the specimen tube to be added in the rack. While scanning multiple specimens, tube.tracker automatically moves the current position forward to the next empty space.<br>If the position that is currently marked is not correct, click on the correct position in the grid. The blue marker will move to the correct position and the Current Position display will change accordingly. | # Ensure that the current position (represented by the blue square) matches the position of the specimen tube to be added in the rack. While scanning multiple specimens, tube.tracker automatically moves the current position forward to the next empty space.<br>If the position that is currently marked is not correct, click on the correct position in the grid. The blue marker will move to the correct position and the Current Position display will change accordingly. | ||
# Add the Specimen ID in the box labeled '''Specimen ID''' by scanning the specimen label with a barcode scanner or using a keyboard to type in the Specimen ID. When using keyboard entry, pressing the Enter key on the keyboard after inputting the Specimen ID will submit the Specimen ID and advance to the next available position.[[image:bulk_add_change_rack_pos.jpg|none|frame|'''Bulk entry screen''']]<br clear="all" /> | # Add the Specimen ID in the box labeled '''Specimen ID''' by scanning the specimen label with a barcode scanner or using a keyboard to type in the Specimen ID. When using keyboard entry, pressing the Enter key on the keyboard after inputting the Specimen ID will submit the Specimen ID and advance to the next available position.[[image:bulk_add_change_rack_pos.jpg|none|frame|'''Bulk entry screen''']]<br clear="all" /> | ||
| − | + | ||
| + | Correct an error in an entered specimen: | ||
# Click on the position of the specimen to be changed. The blue square will appear over the rack position and a '''Specimen Operations''' dialog box will appear. This box displays the different operations available to the user. | # Click on the position of the specimen to be changed. The blue square will appear over the rack position and a '''Specimen Operations''' dialog box will appear. This box displays the different operations available to the user. | ||
# If the specimen does not have a note associated with it:[[image:bulk_add_change_rack_pos_sans_note.jpg|none|frame|'''Specimen Operations box: <br>No specimen note''']] | # If the specimen does not have a note associated with it:[[image:bulk_add_change_rack_pos_sans_note.jpg|none|frame|'''Specimen Operations box: <br>No specimen note''']] | ||
Revision as of 22:40, 6 January 2014
When a rack of specimens is ready to be stored in a container; the rack, the specimens it contains, and the destination container must all be recorded in Tube Tracker.
Contents
Opening the Rack Adding Screen
- Click Add in the Navigation Menu under the heading Racks.
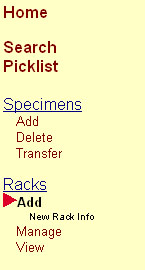 Navigation Menu
Racks > Add - The Rack Adding Screen will appear.
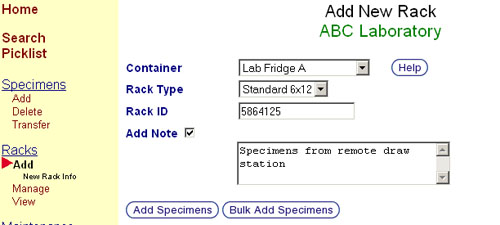 Rack Adding Screen


Adding a Rack
- Select a destination container from the Container drop down menu to designate where Tube Tracker will store the rack. If administrators have specified a default container, it will be pre-selected. Rack Adding Screen
- Select the type of rack from the Rack Type drop-down menu. If administrators have specified a default rack type, it will be pre-selected.
- Enter or scan a Rack ID into the Rack ID text box. If the provided Rack ID is already in use, Tube Tracker will display an error message and request that a new, unique Rack ID be entered. While every rack must have a unique Rack ID, this does not mean that racks cannot be emptied and reused.
- Click on the Add Note check box to reveal a text box in which a note about this rack can be added.
- To save the rack and proceed to adding specimens to it, click the button corresponding to one of the two entry methods listed below:
- Bulk Add Specimens: This method reduces the loading time when adding specimens by forcing the user to save the entered specimens when all of the specimens in the rack have been entered as opposed to saving each specimen as it is entered. Therefore, this method is best used when a rack of specimens will be entered over a short period of time. Using this method over a longer period of time increases the risk of the user's session timing out and the entered but unsaved specimen data being lost.
- Note: This feature requires Microsoft Internet Explorer 4.0+ or Netscape 6.0+
- Add Specimens: Also referred to as the Conventional Add Specimens method. This is the most reliable method for specimen entry. As each specimen is scanned or otherwise entered, it is saved before entering the next specimen. Therefore, this method is best used when a rack of specimens will be entered over a longer period of time. Using this method over a shorter period of time may unnecessarily increase the amount of time needed to enter a rack of specimens by saving each specimen as it is entered as opposed to saving the rack after all of the specimens have been entered.
- Pressing the Enter key on the keyboard after typing or scanning in the Rack ID will automatically select the preferred method for the browser (Typically this will be Bulk Add Specimens).
- Bulk Add Specimens: This method reduces the loading time when adding specimens by forcing the user to save the entered specimens when all of the specimens in the rack have been entered as opposed to saving each specimen as it is entered. Therefore, this method is best used when a rack of specimens will be entered over a short period of time. Using this method over a longer period of time increases the risk of the user's session timing out and the entered but unsaved specimen data being lost.
Specimen Adding Screens
Overview
The Bulk and Conventional Specimen Adding Screens contain many of the same characteristics including a Header, Graphical Rack Representation & Specimen Data Entry Section.
 Bulk Specimen Entry Screen |  Conventional Specimen Entry Screen |
Header
At the top of both specimens adding screens are the current entry method in black text, followed by the Rack ID and Destination Container on the line below in green text. Bulk Specimen Entry Screen Header |  Conventional Specimen Entry Screen Header |
Graphical Rack Representation
Below the page header and on the left side of the screen is the graphical representation of the selected rack shown as either a blue grid for a two-dimensional rack or a list for a dimensionless rack. In the example shown below, a 6x12 rack is displayed on the left and a dimensionless rack is displayed on the right.
- Graphical rack representations
Two Dimensional Rack
Dimensionless Rack

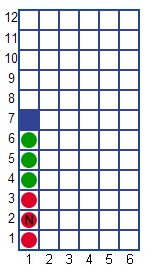
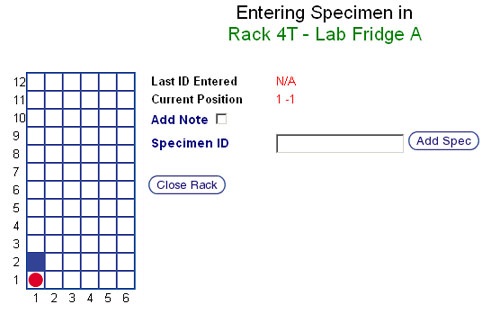
For two-dimensional racks, the columns and rows are labeled such that each position in the rack can be identified using two numbers or a letter and a number depending on the institution's settings. Position 2-3 (or B-3) refers to the second column from the left and the third row from the bottom. Column numbers (or letters) increase from left to right and row numbers increase from bottom to top. Each square in this grid represents either a specimen or an open space where a specimen can be stored. It is color coded as such:
- The Blue square (1-7 in the two dimensional rack example below) indicates the position where the next specimen will be input. By default, it will start in position 1-1 (or A-1) and will increment one row every time a specimen tube is scanned.
- White squares denote open positions on the rack that can accept a new specimen or remain empty.
- Red circles indicate previously scanned specimens that have been saved successfully. If the red circle surrounds a black N then there is a note for that specimen.
- Green circles represent specimens that have been added but not saved. They appear only when using the Bulk Add Specimens Method since the Conventional Add Specimens Method saves the rack after each specimen is entered.
- Reveal the Specimen ID of a specimen by holding the mouse pointer over a specimen. This is quick and easy method of verifying previously scanned specimens.

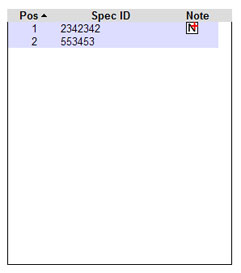
Specimen Data Entry
The specimen data entry portion of the screen displays the details of the entry process and provides the ability to enter new Specimen IDs.
- Last ID Entered: Displays the most recently entered specimen's Specimen ID and Rack Position. If no specimens have been entered yet, this line will display N/A.
- Current Position: Indicates the position in the rack where the next specimen will be entered. This corresponds to the blue box in the Graphical Rack Representation. The Current Position can be changed at any time by clicking on a new position in the grid.
- Add Note check box: Marks the specimen as having a note and will then display a text box where a note can be entered just below the Specimen ID text box.
- Specimen ID text box: Provides the space to type or scan in the current Specimen ID.
Bulk Add Method
Adding a specimen:
- Ensure that the current position (represented by the blue square) matches the position of the specimen tube to be added in the rack. While scanning multiple specimens, tube.tracker automatically moves the current position forward to the next empty space.
If the position that is currently marked is not correct, click on the correct position in the grid. The blue marker will move to the correct position and the Current Position display will change accordingly. - Add the Specimen ID in the box labeled Specimen ID by scanning the specimen label with a barcode scanner or using a keyboard to type in the Specimen ID. When using keyboard entry, pressing the Enter key on the keyboard after inputting the Specimen ID will submit the Specimen ID and advance to the next available position.
 Bulk entry screen

Correct an error in an entered specimen:
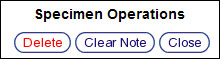
- Click on the position of the specimen to be changed. The blue square will appear over the rack position and a Specimen Operations dialog box will appear. This box displays the different operations available to the user.
- If the specimen does not have a note associated with it:
 Specimen Operations box:
No specimen note- Delete: Deletes the currently selected specimen from the rack.
- Add Note: Marks that there is now a note for this specimen and brings up the text box for a note to be entered. Click the Update button after adding a note to save and continue.
- Close: Closes the Specimen Operations box selects the next open space for a specimen to be added.
- If the specimen does have a note associated with it:
 Specimen Operations box:
With specimen note- Delete: Deletes the currently selected specimen from the rack.
- Clear Note: Removes the note from the specimen and marks the specimen as having no note.
- Update a note by changing its text as desired and clicking the Update button.


- If the rack is filled to capacity by scanning a specimen into the last open position, tube.tracker will automatically save the rack.
- If the rack is not filled to capacity, click the Save Rack button. This will submit the specimen data and save the rack. After a rack is saved, the Add New Rack page appear for the next rack to be added.
- Press the Enter key on the keyboard
- Scan a tube
- Use the shortcut key - Ctrl-Q when the note text box is displayed
- Click the Add Spec button whether or not there is a note
Conventional Add Method
- Appearance and functionality of the Conventional Add Method is very similar to the Bulk Add Method listed above. Please read the Bulk Add Method section for basic specimen input information. The differences will be highlighted below.
- Similar to the Bulk Add Method, at the top of the Conventional Add Specimens screen is the the current entry method in black text, followed by the Rack ID and Destination Container below it in green text. Confirm that this information is correct before beginning input. If any of the information is incorrect, click the Close Rack button to re-enter the rack information.
 Conventional entry denote lines
 - The graphical rack representation is identical in look and feel to the Bulk Entry Method. The blue square indicates current position. Red circles represent scanned specimens. Holding the mouse pointer over a red circle will display a popup containing the Specimen ID. Unlike the Bulk Add Method, specimens are stored immediately so there are no green circles. Rack positions are represented in X-Y format. Please refer to the Bulk Add Method section above for more information.
 Conventional specimen entry screen
 - The entry process is identical to the Bulk Method except for a few minor differences:
- When the Add Note box is checked and the note text area is displayed, pressing Enter or scanning in a tube will NOT advance the cursor to the note text area, instead the specimen will be added to the rack.
- There is no shortcut key (Ctrl-Q) available in the conventional specimen entry method.
- The reasons for these differences can be attributed to older internet browser compatibility.
- Since the specimens are stored immediately, there may be a brief delay while the page loads during which the browser is not yet ready to accept the next specimen. It is important to observe this behavior and only attempt to add a new specimen when the browser is idle. A specimen may not get entered correctly if the previous specimen has not had a chance to get entered into the rack.
- When a rack is filled, the user will be returned to the Add New Rack Screen. If the user is finished adding tubes to a rack before the rack fills, clicking Close Rack will end the specimen entry process.
