Difference between revisions of "Adding specimens to an existing rack"
From Tubetracker
| (5 intermediate revisions by the same user not shown) | |||
| Line 1: | Line 1: | ||
| − | It is sometimes necessary to add additional specimens to a rack already entered into tube.tracker | + | It is sometimes necessary to add additional specimens to a rack already entered into tube.tracker. There are two methods for adding specimens. The first is the default method and is identical to the [[Adding_racks_of_specimens#Bulk_Add_Method|Bulk Add Method]] for a new rack. The second is similar to the [[Adding_racks_of_specimens#Conventional_Add_Method|Conventional Add Method]] and can only be used if your internet browser cannot perform the bulk method. |
| + | |||
| + | |||
| + | == Opening the Specimen Entry - Rack Search Screen == | ||
| + | |||
| + | # Click '''Add''' under the menu heading Specimens.[[image:add_specimens_menu.jpg|none|frame|'''Navigation Menu<br/>Specimens > Add''']]<br clear="all" /> | ||
| + | # The Specimen Entry Rack Search Screen will appear.[[image:add_specimens_start.jpg|none|frame|'''Specimen Entry - Rack Search Screen''']]<br clear="all" /> | ||
| + | |||
| + | |||
| + | == Locating & Selecting a Rack == | ||
| + | There are two ways to locate and select the rack to which specimens will be added. | ||
| + | |||
| + | |||
| + | === Search for Racks by Rack ID === | ||
| + | |||
| + | # Type or Scan a Rack ID into the '''Search for a Rack ID Text Box'''. Wildcards may be used. | ||
| + | # Press the '''Enter Key''' on the keyboard or click the '''Search Button'''. | ||
| + | # A list of the racks matching the search term will be displayed. The Rack ID for each rack listed will be a clickable link.[[image:add_specimens_rack_search.jpg|none|frame|'''Specimen Entry - Rack Search Results Screen''']] | ||
| + | # Click on a '''Rack ID Link''' to select the rack in which specimens will be added. | ||
| + | # The Specimen Entry Screen will be displayed. | ||
| + | |||
| + | |||
| + | === Browse Containers for Racks === | ||
| + | Containers will be listed under the '''Select a Container''' heading. | ||
| + | |||
| + | # Click on the '''Container Name Link''' for the container in which the rack is stored | ||
| + | # A list of the racks in the selected container will be displayed. The Rack ID for each rack listed will be a clickable link. | ||
| + | # Click on a '''Rack ID Link''' to select the rack in which specimens will be added. | ||
| + | # The Specimen Entry Screen will be displayed. | ||
| + | |||
| + | |||
| + | == Specimen Entry Screens == | ||
| + | At the top of specimens entry screens is the current entry method in black text, followed by the Rack ID and destination Container Name on the line below in green text. <table><tr><td>[[image:Bulk_add_top_lines.jpg|none|frame|'''Bulk Specimen Entry Screen<br/>Header''']]</td><td>[[image:conventional_add_top_lines.jpg|none|frame|'''Conventional Specimen Entry Screen<br/>Header''']]</td></tr></table><br/> | ||
| + | * If the Bulk Specimen Entry Screen is displayed, refer to the [[Adding_racks_of_specimens#Bulk_Specimen_Entry_Method|Bulk Specimen Entry Method]] page. | ||
| + | * If the Conventional Specimen Entry Screen is displayd, refer to the [[Adding_racks_of_specimens#Conventional_Add_Method|Conventional Specimen Entry Method]] page. | ||
| − | |||
| − | |||
| − | |||
| − | |||
| − | |||
| − | |||
| − | |||
| − | |||
| − | |||
| − | |||
| − | |||
| − | |||
| − | |||
| − | |||
| − | |||
| − | |||
| − | |||
| − | |||
Back to the [[Online Documentation]] | Back to the [[Online Documentation]] | ||
Latest revision as of 19:10, 7 January 2014
It is sometimes necessary to add additional specimens to a rack already entered into tube.tracker. There are two methods for adding specimens. The first is the default method and is identical to the Bulk Add Method for a new rack. The second is similar to the Conventional Add Method and can only be used if your internet browser cannot perform the bulk method.
Contents
Opening the Specimen Entry - Rack Search Screen
- Click Add under the menu heading Specimens.
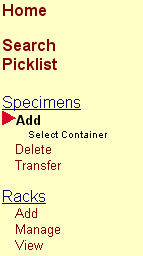 Navigation Menu
Specimens > Add - The Specimen Entry Rack Search Screen will appear.
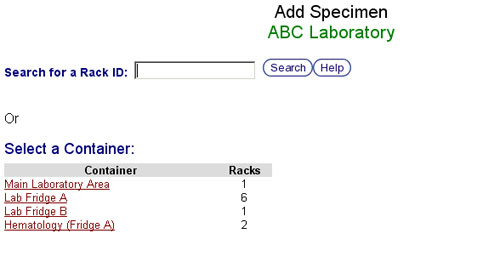 Specimen Entry - Rack Search Screen


Locating & Selecting a Rack
There are two ways to locate and select the rack to which specimens will be added.
Search for Racks by Rack ID
- Type or Scan a Rack ID into the Search for a Rack ID Text Box. Wildcards may be used.
- Press the Enter Key on the keyboard or click the Search Button.
- A list of the racks matching the search term will be displayed. The Rack ID for each rack listed will be a clickable link.
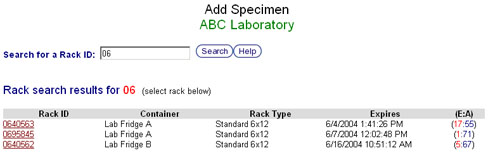 Specimen Entry - Rack Search Results Screen
 - Click on a Rack ID Link to select the rack in which specimens will be added.
- The Specimen Entry Screen will be displayed.

Browse Containers for Racks
Containers will be listed under the Select a Container heading.
- Click on the Container Name Link for the container in which the rack is stored
- A list of the racks in the selected container will be displayed. The Rack ID for each rack listed will be a clickable link.
- Click on a Rack ID Link to select the rack in which specimens will be added.
- The Specimen Entry Screen will be displayed.
Specimen Entry Screens
At the top of specimens entry screens is the current entry method in black text, followed by the Rack ID and destination Container Name on the line below in green text. Bulk Specimen Entry Screen Header |  Conventional Specimen Entry Screen Header |
- If the Bulk Specimen Entry Screen is displayed, refer to the Bulk Specimen Entry Method page.
- If the Conventional Specimen Entry Screen is displayd, refer to the Conventional Specimen Entry Method page.
Back to the Online Documentation