Difference between revisions of "Adding specimens to an existing rack"
From Tubetracker
| Line 2: | Line 2: | ||
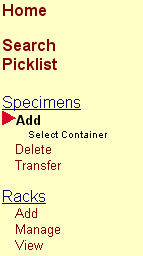
# Click '''Add''' under the menu heading Specimens. The Add Specimen screen will appear.[[image:add_specimens_menu.jpg|none|frame|'''Add specimen menu''']]<br clear="all" /> | # Click '''Add''' under the menu heading Specimens. The Add Specimen screen will appear.[[image:add_specimens_menu.jpg|none|frame|'''Add specimen menu''']]<br clear="all" /> | ||
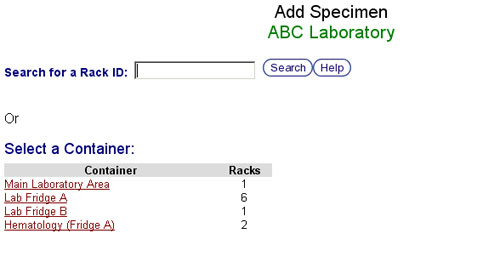
| − | # Identifying the rack to which the additional specimens will be added. There are two ways to do this:[[image:add_specimens_start.jpg|none|frame|'''Add specimens start screen''']]<br clear="all" /> | + | # Identifying the rack to which the additional specimens will be added. There are two ways to do this: |
| − | # | + | #* Searching for a Rack ID |
| − | + | #* Browsing Containers[[image:add_specimens_start.jpg|none|frame|'''Add specimens start screen''']]<br clear="all" /> | |
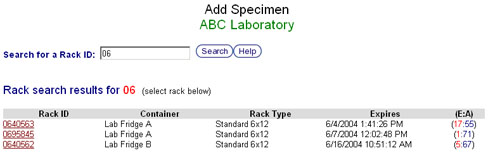
| − | # ''Searching for a Rack ID'': This can be done by keyboard entry or by scanning a rack's barcode into the <b>Searching for a Rack ID</b> box on the main Add Specimen screen. A list of racks matching the search terms will be displayed. Click on a Rack ID to select that rack.[[image:add_specimens_rack_search.jpg|none|frame|'''Add specimens rack search results''']]<br | + | ## ''Searching for a Rack ID'': This can be done by keyboard entry or by scanning a rack's barcode into the <b>Searching for a Rack ID</b> box on the main Add Specimen screen. A list of racks matching the search terms will be displayed. Click on a Rack ID to select that rack.[[image:add_specimens_rack_search.jpg|none|frame|'''Add specimens rack search results''']]<br/> |
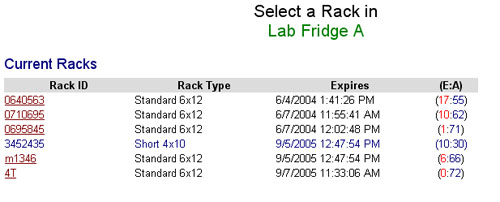
| − | # ''Browsing Containers'': A rack can be located by browsing the containers listed below the search box. Only containers that | + | ## ''Browsing Containers'': A rack can be located by browsing the containers listed below the search box. If a search for a Rack ID has been conducted using the previous method, click Select Container under Specimens and Add on the menu. Only containers that contain racks can be selected. When a container is selected from this screen, a list of active racks stored in the container is displayed. Click the Rack ID of the rack to which the specimens will be added.[[image:add_specimens_container_listing.jpg|none|frame|'''Add specimens container listing''']]<br clear="all" /> |
# After a rack has been selected, the Add Specimen page is displayed. The Rack ID and Container are listed at the top for confirmation. A graphical representation of the rack is displayed below and to the left. Notice that the rows and columns are labeled. With this, each position in the rack can be identified using a column number (or letter) and a row number. Position 2-3 (or B-3) refers to the second column, third row. Row numbers increase from bottom to top and column numbers (or letters) increase from left to right.[[image:add_specimens_enter.jpg|none|frame|'''Add specimens entry screen''']]<br clear="all" /> | # After a rack has been selected, the Add Specimen page is displayed. The Rack ID and Container are listed at the top for confirmation. A graphical representation of the rack is displayed below and to the left. Notice that the rows and columns are labeled. With this, each position in the rack can be identified using a column number (or letter) and a row number. Position 2-3 (or B-3) refers to the second column, third row. Row numbers increase from bottom to top and column numbers (or letters) increase from left to right.[[image:add_specimens_enter.jpg|none|frame|'''Add specimens entry screen''']]<br clear="all" /> | ||
| − | #* The <span style="color: #000080;"> | + | #* The <span style="color: #000080;">'''Blue'''</span> square (3-7 in the two dimensional rack example above) indicates the position where the next specimen will be input. By default, it will start in position 1-1 (or A-1) and will increment one row every time a specimen tube is scanned. |
| − | #* <span style="color: # | + | #* <span style="color: #FFFFFF; background-color: #000000;">'''White'''</span> squares denote open positions on the rack that can accept a new specimen or remain empty. |
| − | #* <span style="color: # | + | #* <span style="color: #FF0000">'''Red'''</span> circles indicate previously scanned specimens that have been saved to the tube.tracker database successfully. If the red circle surrounds a black N then there is a note for that specimen. |
| − | #* <span style="color: # | + | #* <span style="color: #008000">'''Green'''</span> circles represent specimens that have been added but not saved to the tube.tracker database. |
| + | # Reveal the Specimen ID of a specimen by holding the mouse pointer over a specimen. This is a quick and easy method of verifying previously scanned specimens. | ||
# Click an empty space on the rack to indicate the first position where the additional specimens will be added. This space will be highlighted in blue. By default the first available position is already selected. | # Click an empty space on the rack to indicate the first position where the additional specimens will be added. This space will be highlighted in blue. By default the first available position is already selected. | ||
# You will notice how similar this screen is to the Bulk Add Method for new racks. A brief description of this page: | # You will notice how similar this screen is to the Bulk Add Method for new racks. A brief description of this page: | ||
Revision as of 17:35, 24 December 2013
It is sometimes necessary to add additional specimens to a rack already entered into tube.tracker. There are two methods for adding specimens. The first is the default method and is identical to the Bulk Add Method for a new rack. The second is similar to the Conventional Add Method and can only be used if your internet browser cannot perform the bulk method.
- Click Add under the menu heading Specimens. The Add Specimen screen will appear.
 Add specimen menu
 - Identifying the rack to which the additional specimens will be added. There are two ways to do this:
- Searching for a Rack ID
- Browsing Containers
 Add specimens start screen
- Searching for a Rack ID: This can be done by keyboard entry or by scanning a rack's barcode into the Searching for a Rack ID box on the main Add Specimen screen. A list of racks matching the search terms will be displayed. Click on a Rack ID to select that rack.
 Add specimens rack search results
 - Browsing Containers: A rack can be located by browsing the containers listed below the search box. If a search for a Rack ID has been conducted using the previous method, click Select Container under Specimens and Add on the menu. Only containers that contain racks can be selected. When a container is selected from this screen, a list of active racks stored in the container is displayed. Click the Rack ID of the rack to which the specimens will be added.
 Add specimens container listing
- After a rack has been selected, the Add Specimen page is displayed. The Rack ID and Container are listed at the top for confirmation. A graphical representation of the rack is displayed below and to the left. Notice that the rows and columns are labeled. With this, each position in the rack can be identified using a column number (or letter) and a row number. Position 2-3 (or B-3) refers to the second column, third row. Row numbers increase from bottom to top and column numbers (or letters) increase from left to right.
 Add specimens entry screen
- The Blue square (3-7 in the two dimensional rack example above) indicates the position where the next specimen will be input. By default, it will start in position 1-1 (or A-1) and will increment one row every time a specimen tube is scanned.
- White squares denote open positions on the rack that can accept a new specimen or remain empty.
- Red circles indicate previously scanned specimens that have been saved to the tube.tracker database successfully. If the red circle surrounds a black N then there is a note for that specimen.
- Green circles represent specimens that have been added but not saved to the tube.tracker database.
- Reveal the Specimen ID of a specimen by holding the mouse pointer over a specimen. This is a quick and easy method of verifying previously scanned specimens.
- Click an empty space on the rack to indicate the first position where the additional specimens will be added. This space will be highlighted in blue. By default the first available position is already selected.
- You will notice how similar this screen is to the Bulk Add Method for new racks. A brief description of this page:
- Last ID Entered: Displays the most recently scanned Specimen ID. If no specimens have been scanned yet, this line will display N/A.
- Current Position: the position in the rack where tube.tracker is expecting the next specimen to be scanned. This should correspond to the blue box in the graphical rack representation to the left.
- Add Note: Checkbox that indicates if a note will be added to the specimen. When the Add Note box is checked the note text area will appear below the Specimen ID box.
- Specimen ID: The specimen ID is entered into this box. This action is typically performed by a barcode scanner reading the specimen label. However, keyboard input is accepted here too. When using keyboard entry, pressing Enter or Ctrl-Q after inputting the Specimen ID will submit the Specimen ID and advance the current position. Note: Pressing Enter when the note text area is displayed will move the cursor to the note area. Pressing Enter when the note text area is NOT displayed will enter the specimen into the rack.
- At this point, the application behaves just like bulk adding specimens into a new rack. As each tube is scanned, the current position indicator will advance to the next open spot on the rack. Clicking the Save Rack button will add the specimens to the rack, close the rack and return you to the main Add Specimen screen.


Back to the Online Documentation