Difference between revisions of "Deleting individual specimens from an existing rack"
From Tubetracker
m (Fixed Image Alignment) |
m (Corrected inaccurate screenshots, corrected grammar) |
||
| Line 1: | Line 1: | ||
| − | tube.tracker offers a Delete Specimen function that allows users to remove specimens from a rack without removing the rack itself. | + | tube.tracker offers a Delete Specimen function that allows users to remove specimens from a rack without removing the rack itself. This is not just useful in deleting discarded specimens but also in correcting an incorrectly typed Specimen ID and as an administrative tool for emptying labeled racks to allow them to be reused without needing to be relabeled. |
# Click '''Delete''' under the menu heading '''Specimens'''. The Delete Specimen page will appear.[[image:delete_specimen_menu.jpg|none|frame|'''Delete specimens menu''']]<br clear="all" /> | # Click '''Delete''' under the menu heading '''Specimens'''. The Delete Specimen page will appear.[[image:delete_specimen_menu.jpg|none|frame|'''Delete specimens menu''']]<br clear="all" /> | ||
# There are two ways to delete a specimen: | # There are two ways to delete a specimen: | ||
| − | ## If | + | ## If all or part of the Specimen ID of the specimen to be deleted is known, it can be typed or scanned in directly (See [[Deleting individual specimens from an existing rack#Deleting a specimen by its ID|Deleting a specimen by its ID]]). |
| − | ## If | + | ## If the Specimen ID is unknown, a specimen can be deleted by finding the rack in which it is located (See [[Deleting individual specimens from an existing rack#Deleting a specimen by its ID|Deleting a Specimen by Rack]]). |
== Deleting a specimen by its ID == | == Deleting a specimen by its ID == | ||
| − | # From the Delete Specimen page, type a Specimen ID into the field labeled "Specimen/Rack ID" and click on the '''Search''' button.[[image:delete_specimen_start.jpg|none|frame|'''Deleted specimens start screen''']]<br clear="all" /> | + | # From the Delete Specimen page, type or scan a Specimen ID into the field labeled "Specimen/Rack ID" and click on the '''Search''' button or press the enter key.[[image:delete_specimen_start.jpg|none|frame|'''Deleted specimens start screen''']]<br clear="all" /> |
| − | # | + | # A list of specimens matching the search criteria will appear. Click on the link under the '''Spec ID''' column that matches the Specimen ID and Rack ID of the specimen.[[image:delete_specimen_search_results_id2.jpg|none|frame|'''Delete specimen ID search results''']]<br clear="all" /> |
| − | # | + | # A confirmation page will appear showing the Specimen ID, Rack ID, and Container for the selected specimen. Confirm that these three details are correct before continuing. If the wrong specimen has been selected, click the '''No''' button to select a different specimen. |
| − | + | # To attach a note, click the '''Add Note''' check box and the note text box will appear. Type the note into this space. | |
| − | # After | + | # Click the '''Yes''' button to remove this specimen from the rack and it will no longer be stored in the system. Click the '''No''' button to cancel the delete action.[[image:delete_specimen_confirmation2.jpg|none|frame|'''Delete specimens confirmation screen''']]<br clear="all" /> |
| + | # After clicking on either the '''Yes''' or '''No''' button, a page will appear with a graphical representation of the rack in which the specimen was stored. This screen is explained below in the Deleting a specimen by rack section starting at Step 3. | ||
== Deleting a specimen by rack == | == Deleting a specimen by rack == | ||
| − | # From the Delete Specimen | + | # From the Delete Specimen page, type or scan a Specimen ID into the field labeled "Specimen/Rack ID" and click on the '''Search''' button or press the enter key.[[image:delete_specimen_start.jpg|none|frame|'''Deleted specimens start screen''']]<br clear="all" /> |
| − | # A list of racks will appear | + | # A list of racks matching the search criteria will appear. Click on the link under the '''Rack ID''' column that matches the Rack ID and the container in which the rack is stored.[[image:delete_specimen_search_results_rack2.jpg|none|frame|'''Delete specimen rack ID search results''']]<br clear="all" /> |
| − | # | + | # A page showing a grid representing the selected rack will appear. This grid will be filled with red dots, each of which represents a specimen. Hold the mouse pointer over a red dot to see the Specimen ID.{[image:delete_specimen_rack_view.jpg|none|frame|'''Delete specimens rack view screen''']]<br clear="all" /> |
| − | # | + | # Click the red dot that corresponds to the specimens ID and position in the rack. |
| − | # | + | # A confirmation page will appear showing the Specimen ID, Rack ID, and Container for the selected specimen. Confirm that these three details are correct before continuing. If the wrong specimen has been selected, click the '''No''' button to select a different specimen. |
| − | + | # To attach a note, click the '''Add Note''' check box and the note text box will appear. Type the note into this space. | |
| − | # After | + | # Click the '''Yes''' button to remove this specimen from the rack and it will no longer be stored in the system. Click the '''No''' button to cancel the delete action.[[image:delete_specimen_confirmation2.jpg|none|frame|'''Delete specimens confirmation screen''']]<br clear="all" /> |
| − | + | # After clicking on either the '''Yes''' or '''No''' button, the graphical representation of the rack in which the specimen was stored will be shown again so that other specimens from the rack may be deleted. | |
Back to the [[Online Documentation]] | Back to the [[Online Documentation]] | ||
Revision as of 16:56, 26 December 2013
tube.tracker offers a Delete Specimen function that allows users to remove specimens from a rack without removing the rack itself. This is not just useful in deleting discarded specimens but also in correcting an incorrectly typed Specimen ID and as an administrative tool for emptying labeled racks to allow them to be reused without needing to be relabeled.
- Click Delete under the menu heading Specimens. The Delete Specimen page will appear.
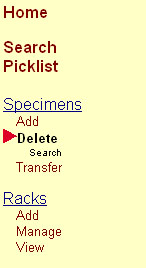 Delete specimens menu
 - There are two ways to delete a specimen:
- If all or part of the Specimen ID of the specimen to be deleted is known, it can be typed or scanned in directly (See Deleting a specimen by its ID).
- If the Specimen ID is unknown, a specimen can be deleted by finding the rack in which it is located (See Deleting a Specimen by Rack).

Deleting a specimen by its ID
- From the Delete Specimen page, type or scan a Specimen ID into the field labeled "Specimen/Rack ID" and click on the Search button or press the enter key.
 Deleted specimens start screen
 - A list of specimens matching the search criteria will appear. Click on the link under the Spec ID column that matches the Specimen ID and Rack ID of the specimen.
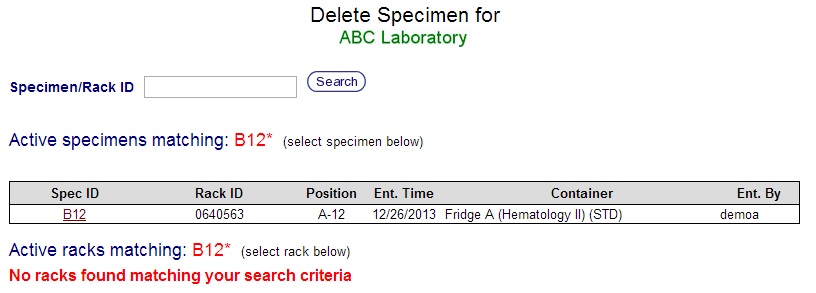 Delete specimen ID search results
 - A confirmation page will appear showing the Specimen ID, Rack ID, and Container for the selected specimen. Confirm that these three details are correct before continuing. If the wrong specimen has been selected, click the No button to select a different specimen.
- To attach a note, click the Add Note check box and the note text box will appear. Type the note into this space.
- Click the Yes button to remove this specimen from the rack and it will no longer be stored in the system. Click the No button to cancel the delete action.
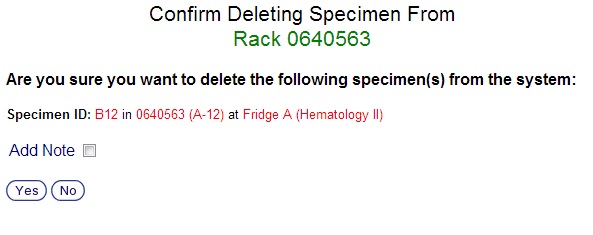 Delete specimens confirmation screen
 - After clicking on either the Yes or No button, a page will appear with a graphical representation of the rack in which the specimen was stored. This screen is explained below in the Deleting a specimen by rack section starting at Step 3.


Deleting a specimen by rack
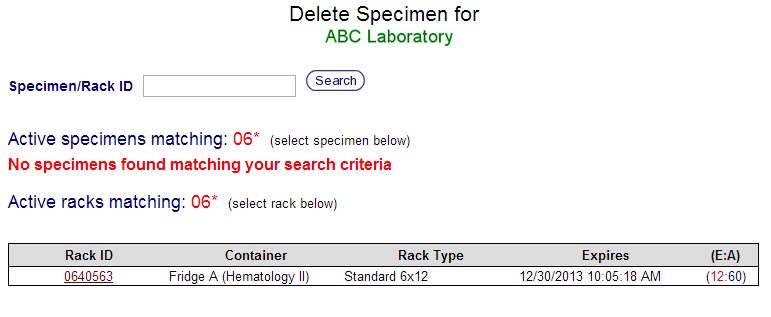
- From the Delete Specimen page, type or scan a Specimen ID into the field labeled "Specimen/Rack ID" and click on the Search button or press the enter key. Deleted specimens start screen
- A list of racks matching the search criteria will appear. Click on the link under the Rack ID column that matches the Rack ID and the container in which the rack is stored.
 Delete specimen rack ID search results
 - A page showing a grid representing the selected rack will appear. This grid will be filled with red dots, each of which represents a specimen. Hold the mouse pointer over a red dot to see the Specimen ID.{[image:delete_specimen_rack_view.jpg|none|frame|Delete specimens rack view screen]]
- Click the red dot that corresponds to the specimens ID and position in the rack.
- A confirmation page will appear showing the Specimen ID, Rack ID, and Container for the selected specimen. Confirm that these three details are correct before continuing. If the wrong specimen has been selected, click the No button to select a different specimen.
- To attach a note, click the Add Note check box and the note text box will appear. Type the note into this space.
- Click the Yes button to remove this specimen from the rack and it will no longer be stored in the system. Click the No button to cancel the delete action. Delete specimens confirmation screen
- After clicking on either the Yes or No button, the graphical representation of the rack in which the specimen was stored will be shown again so that other specimens from the rack may be deleted.

Back to the Online Documentation