Difference between revisions of "Deleting individual specimens from an existing rack"
From Tubetracker
m (Corrected inaccurate screenshots, corrected grammar) |
|||
| Line 1: | Line 1: | ||
| − | + | Specimens can be deleted from a rack without deleting the rack itself. This is not just useful in deleting discarded specimens but also as an administrative tool for emptying racks that are labeled allowing them to be reused without needing to be relabeled. | |
| − | |||
| − | |||
| − | |||
| − | |||
| − | == | + | == Opening the Specimen Deletion - Rack Search Screen == |
| − | # | + | # Click '''Delete''' in the Navigation Menu under the '''Specimens''' heading.[[image:delete_specimen_menu.jpg|none|frame|'''Navigation Menu<br/>Specimens > Delete''']]<br clear="all" /> |
| − | + | # The '''Specimen Deletion Search Screen''' will be displayed.[[image:delete_specimen_start.jpg|none|frame|'''Specimen Deletion Search Screen''']]<br clear="all" /> | |
| − | # | ||
| − | |||
| − | |||
| − | |||
| − | |||
| − | # | + | == Locating Specimens Being Deleted == |
| − | # | + | There are two ways to locate specimens being deleted: |
| − | # | + | # '''Specimen ID Search''': When part or all of the ID of the specimen being deleted is known, searching by Specimen ID will locate the individual specimen. |
| − | # Click the | + | # '''Rack ID Search''': When the Specimen ID is unknown or when all or a significant portion of a rack's specimens are being deleted, searching by Rack ID will display a list of racks matching the search term. Selecting the rack that contains the specimen(s) being deleted will display the Graphical Rack Representation in which specimens can be selected for deletion. |
| − | # | + | Regardless of whether a Specimen ID or Rack ID was used as the search term, tube.tracker will display lists of both specimens and racks matching the search term. |
| − | # | + | |
| − | # Click the | + | |
| − | # | + | === Deleting a Specimen by Specimen ID Search === |
| + | |||
| + | # Type or scan a Specimen ID into the '''Specimen/Rack ID Text Box'''. Wildcards are permitted when only a portion of a Specimen ID is known. | ||
| + | # Click the '''Search Button''' or press the '''Enter Key''' on the keyboard. | ||
| + | # A list of specimens matching the search term will be displayed. The Specimen ID for each specimen listed will be a clickable link.[[image:delete_specimen_search_results_id2.jpg|none|frame|'''Specimen Deletion - Specimen Search Results Screen''']]<br clear="all" /> | ||
| + | # Click on the '''Specimen ID Link''' corresponding to the specimen being deleted. Ensure that the Specimen ID, Rack ID, Position in Rack, and Container Name all match the specimen being deleted since multiple specimens may have the same Specimen ID. | ||
| + | # The Specimen Deletion Confirmation Screen will be displayed showing the Specimen ID, Rack ID, Position in Rack, and Container Name for the selected specimen.[[image:delete_specimen_confirmation2.jpg|none|frame|'''Specimens Deletion Confirmation Screen''']]<br clear="all" /> | ||
| + | # Ensure that the Specimen ID, Rack ID, Position in Rack, and Container Name for the selected specimen match those of the specimen being deleted. If the wrong specimen has been selected, click the '''No Button''' to go to the '''Specimen Deletion - Rack View Screen''' to select a different specimen from the same rack. | ||
| + | # Click on the '''Add Note Check Box''' to display the '''Add Note Text Box''' in which a note can now be entered if desired. | ||
| + | # Click the '''Yes Button''' to delete this specimen from the rack. | ||
| + | # The '''Specimen Deletion - Rack View Screen''' will be displayed from which other specimens from the same rack may be deleted.[[image:delete_specimen_rack_view.jpg|none|frame|'''Specimens Deletion - Rack View Screen''']]<br clear="all" /> | ||
| + | # Delete additional specimens from this rack using this screen by referring to steps 6-12 in [[Deleting_individual_specimens_from_an_existing_rack#Deleting_a_Specimen_by_Rack_ID_Search|Deleting a Specimen by Rack ID Search]] section of this page. | ||
| + | # Click the '''Close Rack Button''' to return to the Specimen Deletion Search Screen to locate the next specimen being deleted. | ||
| + | |||
| + | |||
| + | === Deleting a Specimen by Rack ID Search === | ||
| + | |||
| + | # Type or scan a Rack ID into the '''Specimen/Rack ID Text Box'''. Wildcards are permitted when only a portion of a Rack ID is known. | ||
| + | # Click the '''Search Button''' or press the '''Enter Key''' on the keyboard. | ||
| + | # A list of racks matching the search term will be displayed. The Rack ID for each rack listed will be a clickable link.[[image:delete_specimen_search_results_rack2.jpg|none|frame|'''Specimen Deletion - Specimen Search Results Screen''']]<br clear="all" /> | ||
| + | # Click on the '''Rack ID Link''' corresponding to the rack containing the specimen being deleted. | ||
| + | # The '''Specimen Deletion - Rack View Screen''' will be displayed.[[image:delete_specimen_rack_view.jpg|none|frame|'''Specimens Deletion - Rack View Screen''']]<br clear="all" /> | ||
| + | # Place the mouse pointer over any of the displayed specimens to view their Specimen IDs. | ||
| + | # Click the specimen being deleted. | ||
| + | # The Specimen Deletion Confirmation Screen will be displayed showing the Specimen ID, Rack ID, Position in Rack, and Container Name for the selected specimen.[[image:delete_specimen_confirmation2.jpg|none|frame|'''Specimens Deletion Confirmation Screen''']]<br clear="all" /> | ||
| + | # Ensure that the Specimen ID, Rack ID, Position in Rack, and Container Name for the selected specimen match those of the specimen being deleted. If the wrong specimen has been selected, click the '''No Button''' to return to the '''Specimen Deletion - Rack View Screen''' to select a different specimen from the same rack. | ||
| + | # Click on the '''Add Note Check Box''' to display the '''Add Note Text Box''' in which a note can now be entered if desired. | ||
| + | # Click the '''Yes Button''' to delete this specimen from the rack. | ||
| + | # The '''Specimen Deletion - Rack View Screen''' will be displayed from which other specimens from the same rack may be deleted. | ||
| + | # Repeat steps 6-12 until all specimens being deleted from this rack have been deleted. | ||
| + | # Click the '''Close Rack Button''' to return to the Specimen Deletion Search Screen to locate the next specimen being deleted. | ||
| + | |||
Back to the [[Online Documentation]] | Back to the [[Online Documentation]] | ||
Revision as of 20:55, 7 January 2014
Specimens can be deleted from a rack without deleting the rack itself. This is not just useful in deleting discarded specimens but also as an administrative tool for emptying racks that are labeled allowing them to be reused without needing to be relabeled.
Contents
Opening the Specimen Deletion - Rack Search Screen
- Click Delete in the Navigation Menu under the Specimens heading.
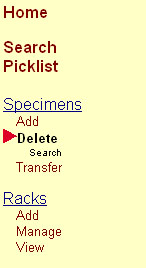 Navigation Menu
Specimens > Delete
- The Specimen Deletion Search Screen will be displayed.
 Specimen Deletion Search Screen


Locating Specimens Being Deleted
There are two ways to locate specimens being deleted:
- Specimen ID Search: When part or all of the ID of the specimen being deleted is known, searching by Specimen ID will locate the individual specimen.
- Rack ID Search: When the Specimen ID is unknown or when all or a significant portion of a rack's specimens are being deleted, searching by Rack ID will display a list of racks matching the search term. Selecting the rack that contains the specimen(s) being deleted will display the Graphical Rack Representation in which specimens can be selected for deletion.
Regardless of whether a Specimen ID or Rack ID was used as the search term, tube.tracker will display lists of both specimens and racks matching the search term.
Deleting a Specimen by Specimen ID Search
- Type or scan a Specimen ID into the Specimen/Rack ID Text Box. Wildcards are permitted when only a portion of a Specimen ID is known.
- Click the Search Button or press the Enter Key on the keyboard.
- A list of specimens matching the search term will be displayed. The Specimen ID for each specimen listed will be a clickable link.
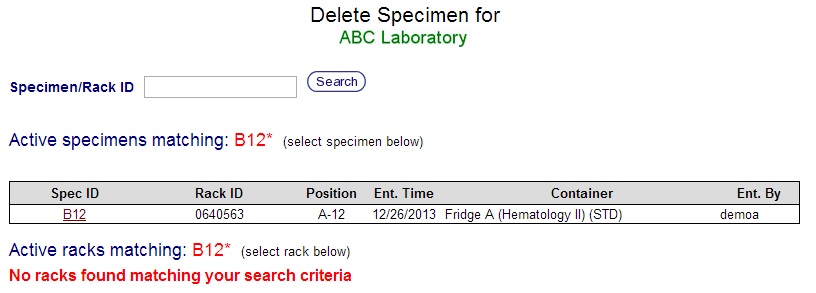 Specimen Deletion - Specimen Search Results Screen
 - Click on the Specimen ID Link corresponding to the specimen being deleted. Ensure that the Specimen ID, Rack ID, Position in Rack, and Container Name all match the specimen being deleted since multiple specimens may have the same Specimen ID.
- The Specimen Deletion Confirmation Screen will be displayed showing the Specimen ID, Rack ID, Position in Rack, and Container Name for the selected specimen.
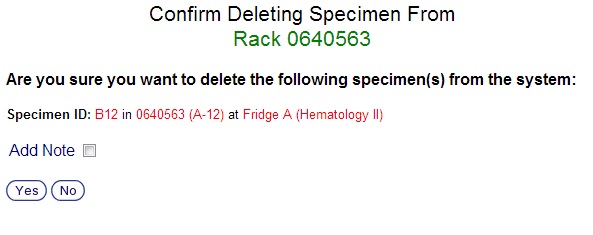 Specimens Deletion Confirmation Screen
 - Ensure that the Specimen ID, Rack ID, Position in Rack, and Container Name for the selected specimen match those of the specimen being deleted. If the wrong specimen has been selected, click the No Button to go to the Specimen Deletion - Rack View Screen to select a different specimen from the same rack.
- Click on the Add Note Check Box to display the Add Note Text Box in which a note can now be entered if desired.
- Click the Yes Button to delete this specimen from the rack.
- The Specimen Deletion - Rack View Screen will be displayed from which other specimens from the same rack may be deleted.
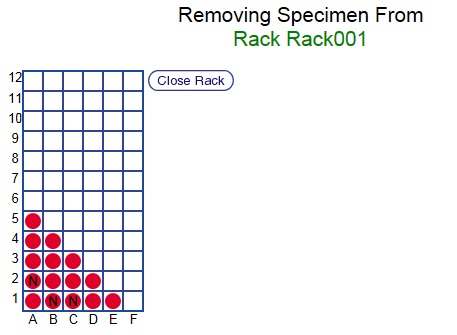 Specimens Deletion - Rack View Screen
 - Delete additional specimens from this rack using this screen by referring to steps 6-12 in Deleting a Specimen by Rack ID Search section of this page.
- Click the Close Rack Button to return to the Specimen Deletion Search Screen to locate the next specimen being deleted.


Deleting a Specimen by Rack ID Search
- Type or scan a Rack ID into the Specimen/Rack ID Text Box. Wildcards are permitted when only a portion of a Rack ID is known.
- Click the Search Button or press the Enter Key on the keyboard.
- A list of racks matching the search term will be displayed. The Rack ID for each rack listed will be a clickable link.
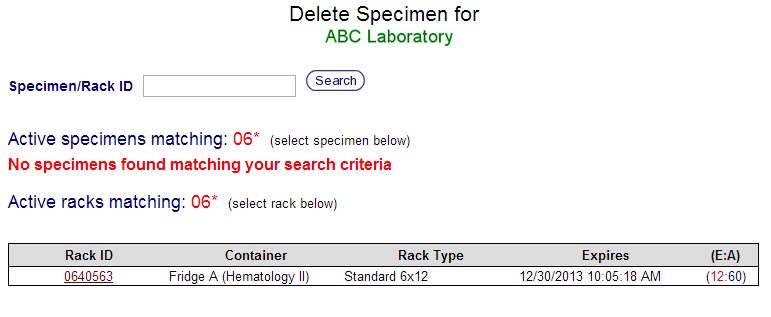 Specimen Deletion - Specimen Search Results Screen
 - Click on the Rack ID Link corresponding to the rack containing the specimen being deleted.
- The Specimen Deletion - Rack View Screen will be displayed. Specimens Deletion - Rack View Screen
- Place the mouse pointer over any of the displayed specimens to view their Specimen IDs.
- Click the specimen being deleted.
- The Specimen Deletion Confirmation Screen will be displayed showing the Specimen ID, Rack ID, Position in Rack, and Container Name for the selected specimen. Specimens Deletion Confirmation Screen
- Ensure that the Specimen ID, Rack ID, Position in Rack, and Container Name for the selected specimen match those of the specimen being deleted. If the wrong specimen has been selected, click the No Button to return to the Specimen Deletion - Rack View Screen to select a different specimen from the same rack.
- Click on the Add Note Check Box to display the Add Note Text Box in which a note can now be entered if desired.
- Click the Yes Button to delete this specimen from the rack.
- The Specimen Deletion - Rack View Screen will be displayed from which other specimens from the same rack may be deleted.
- Repeat steps 6-12 until all specimens being deleted from this rack have been deleted.
- Click the Close Rack Button to return to the Specimen Deletion Search Screen to locate the next specimen being deleted.

Back to the Online Documentation