Difference between revisions of "Discard a rack of specimens"
From Tubetracker
m |
|||
| Line 1: | Line 1: | ||
| − | With a continuous stream of incoming specimens and a finite amount of storage space, regular racked specimen disposal is a necessity for most | + | With a continuous stream of incoming specimens and a finite amount of storage space, regular racked specimen disposal is a necessity for most operations. tube.tracker facilitates this process by enabling users to set an expiration date for racks added to the system. The expiration date allows tube.tracker to generate lists of expired racks that are ready for disposal. tube.tracker retains specimen information long after the physical specimens have been discarded helping laboratories eliminate the need for cumbersome or inefficient systems of specimen storage. |
| − | # Click '''Manage''' | + | |
| − | # Click | + | == Opening the Rack Management - Container Selection Screen == |
| − | # | + | |
| − | #** Expired rack's information is displayed in <span style="color: #FF0000;">'''red'''</span> | + | # Click '''Manage''' in the Navigation Menu under the heading '''Racks'''.[[image:manage_rack_menu.jpg|none|frame|'''Navigation Menu <br/>Racks > Manage''']]<br/> |
| − | #** Active rack's information is displayed in '''black''' | + | # The Rack Management - Container Selection Screen will be displayed. This screen contains a list of containers. The Container Name for each of the containers listed will be a clickable link.[[image:manage_rack_start.jpg|none|frame|'''Rack Management - Container Selection Screen''']]<br clear="all" /> |
| − | #** Locked rack's information is displayed in <span style="color: #000080;">'''blue'''</span> | + | |
| − | # | + | |
| − | # | + | == Locating Expired Racks == |
| − | + | There are two methods for locating expired racks from the Rack Management - Container Selection Screen: | |
| − | + | # [[Discard_a_rack_of_specimens#Locating_Expired_Racks_in_All_Containers|Locating Expired Racks in All Containers]] | |
| + | # [[Discard_a_rack_of_specimens#Locating_Expired_Racks_in_One_Container|Locating Expired Racks in One Container]] | ||
| + | |||
| + | |||
| + | === Locating Expired Racks in All Containers === | ||
| + | |||
| + | # Click the '''Show all expired racks in all containers''' link. | ||
| + | # The '''All Expired Racks Screen''' will be displayed showing all expired racks in all containers.[[image:Manage_racks_show_all_expired.jpg|none|frame|'''All Expired Racks Screen''']]<br clear="all" /> | ||
| + | # Select the check boxes that correspond to the racks being deleted. | ||
| + | # Click the '''Delete Racks Button''' to delete the selected racks. | ||
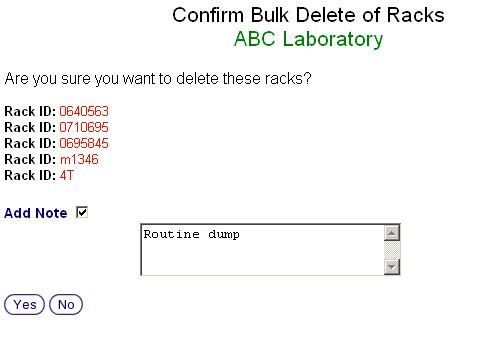
| + | # The '''Rack Deletion Confirmation Screen''' will be displayed listing the Rack ID for racks being deleted.[[image:delete_rack_confirmation2.jpg|none|frame|'''Rack Deletion Confirmation Screen''']]<br clear="all" /> | ||
| + | # Select the '''Add Note Check Box''' to display the '''Add Note Text Box''' in which a note about deleting this rack can be entered if desired. | ||
| + | # Click the '''Yes Button''' to delete the rack and return to the '''All Expired Racks Screen'''. Click the '''No Button''' to return to the '''All Expired Racks Screen''' with out deleting the rack. | ||
| + | |||
| + | |||
| + | === Locating Expired Racks in One Container === | ||
| + | |||
| + | # Click on the '''Container Name Link''' corresponding to the container in which the racks being discarded reside. | ||
| + | # The '''Rack Management - Rack Selection Screen''' will be displayed listing all of the racks currently residing in the selected container with all pertinent information on each rack in the container.[[image:manage_rack_container_rack_listing.jpg|none|frame|'''Rack Management - Rack Selection Screen''']]<br clear="all" /> | ||
| + | #*Racks are sorted by expiration date and the information about each rack, such as Rack Type and Expiration Date, is color coded for quick reference. | ||
| + | #** Expired rack's information is displayed in <span style="color: #FF0000;">'''red text'''</span>. | ||
| + | #** Active rack's information is displayed in '''black text'''. | ||
| + | #** Locked rack's information is displayed in <span style="color: #000080;">'''blue text'''</span>. | ||
| + | # Click the '''Show Expired Racks Button''' to display only racks that are expired if desired. | ||
| + | # Select the check boxes corresponding to the racks being deleted. | ||
| + | # Click the '''Delete Racks Button''' to delete the selected racks. | ||
| + | # The '''Rack Deletion Confirmation Screen''' will be displayed listing the Rack ID for each of the racks being deleted.[[image:delete_rack_confirmation.jpg|none|frame|'''Rack Deletion Confirmation Screen''']]<br clear="all" /> | ||
| + | # Select the '''Add Note Check Box''' to display the '''Add Note Text Box''' in which a note about deleting this rack can be entered if desired. | ||
| + | # Click the '''Yes Button''' to delete the rack and return to the '''Rack Management - Rack Selection Screen'''. Click the '''No Button''' to return to the '''Rack Management - Rack Selection Screen''' with out deleting the rack. | ||
Back to the [[Online Documentation]] | Back to the [[Online Documentation]] | ||
Revision as of 17:17, 8 January 2014
With a continuous stream of incoming specimens and a finite amount of storage space, regular racked specimen disposal is a necessity for most operations. tube.tracker facilitates this process by enabling users to set an expiration date for racks added to the system. The expiration date allows tube.tracker to generate lists of expired racks that are ready for disposal. tube.tracker retains specimen information long after the physical specimens have been discarded helping laboratories eliminate the need for cumbersome or inefficient systems of specimen storage.
Contents
Opening the Rack Management - Container Selection Screen
- Click Manage in the Navigation Menu under the heading Racks.
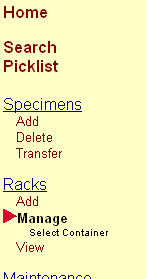 Navigation Menu
Racks > Manage - The Rack Management - Container Selection Screen will be displayed. This screen contains a list of containers. The Container Name for each of the containers listed will be a clickable link.
 Rack Management - Container Selection Screen


Locating Expired Racks
There are two methods for locating expired racks from the Rack Management - Container Selection Screen:
Locating Expired Racks in All Containers
- Click the Show all expired racks in all containers link.
- The All Expired Racks Screen will be displayed showing all expired racks in all containers.
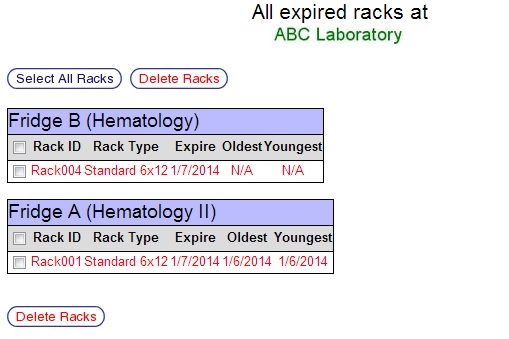 All Expired Racks Screen
 - Select the check boxes that correspond to the racks being deleted.
- Click the Delete Racks Button to delete the selected racks.
- The Rack Deletion Confirmation Screen will be displayed listing the Rack ID for racks being deleted.
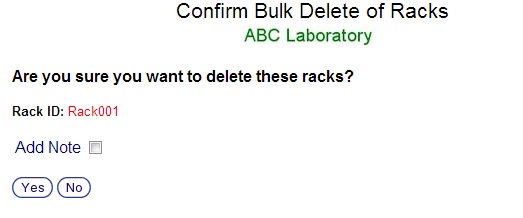 Rack Deletion Confirmation Screen
 - Select the Add Note Check Box to display the Add Note Text Box in which a note about deleting this rack can be entered if desired.
- Click the Yes Button to delete the rack and return to the All Expired Racks Screen. Click the No Button to return to the All Expired Racks Screen with out deleting the rack.


Locating Expired Racks in One Container
- Click on the Container Name Link corresponding to the container in which the racks being discarded reside.
- The Rack Management - Rack Selection Screen will be displayed listing all of the racks currently residing in the selected container with all pertinent information on each rack in the container.
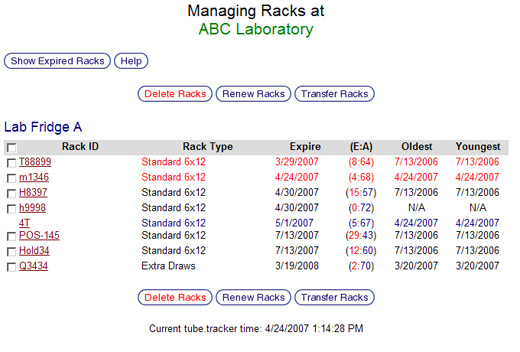 Rack Management - Rack Selection Screen
- Racks are sorted by expiration date and the information about each rack, such as Rack Type and Expiration Date, is color coded for quick reference.
- Expired rack's information is displayed in red text.
- Active rack's information is displayed in black text.
- Locked rack's information is displayed in blue text.
- Racks are sorted by expiration date and the information about each rack, such as Rack Type and Expiration Date, is color coded for quick reference.
- Click the Show Expired Racks Button to display only racks that are expired if desired.
- Select the check boxes corresponding to the racks being deleted.
- Click the Delete Racks Button to delete the selected racks.
- The Rack Deletion Confirmation Screen will be displayed listing the Rack ID for each of the racks being deleted.
 Rack Deletion Confirmation Screen
 - Select the Add Note Check Box to display the Add Note Text Box in which a note about deleting this rack can be entered if desired.
- Click the Yes Button to delete the rack and return to the Rack Management - Rack Selection Screen. Click the No Button to return to the Rack Management - Rack Selection Screen with out deleting the rack.


Back to the Online Documentation