Difference between revisions of "Editing racks and specimens"
From Tubetracker
(New page: As an administrator you have the ability to edit racks and specimens that have already been entered into the system. This is done through the Entered Racks feature. ---+++ Editing Active ...) |
|||
| Line 1: | Line 1: | ||
| − | As an administrator you have the ability to edit racks and specimens that have already been entered into the system. This is done through the Entered Racks feature. | + | :As an administrator you have the ability to edit racks and specimens that have already been entered into the system. This is done through the Entered Racks feature. |
| − | + | == Editing Active Racks == | |
| − | + | ||
| − | + | # Click the '''Entered Racks''' menu option under '''Maintenance'''. A list of containers will be displayed.[[image:edit_rack_spec_menu.jpg|left|frame|'''Edit racks and specimens menu''']]<br clear="all" /> | |
| − | + | # From here, you have two options. You may select a rack by clicking the container it resides in, or you may select the rack by typing its Rack ID in the top field and clicking '''Search'''.[[image:edit_rack_spec_start.jpg|left|frame|'''Edit racks and specimens start screen''']]<br clear="all" /> | |
| − | + | # Once you have chosen a container or entered a search, you will be presented with a list of racks. '''Note''': ''if the search does not find a matching rack, no racks will be listed.'' | |
| − | + | ||
| + | === Selecting a rack to modify === | ||
<ul> | <ul> | ||
<li><i><b>If you selected a container from the Entered Racks page</b></i>: A list will be presented with rack names and the option to <b>Modify</b> or <b>Open</b> them. Click <b>Modify</b> if you want to edit a rack.<br><img style="position: relative; left: 20px; margin-top: 15px; margin-bottom: 15px; border-top: 1px solid #000000; border-left: 1px solid #000000; border-right: 2px solid #000000; border-bottom: 2px solid #000000; clear: both;" src="%ATTACHURLPATH%/edit_rack_spec_container_select.jpg" alt="Edit racks and specimens container select screen" title="Edit racks and specimens container select screen"></li> | <li><i><b>If you selected a container from the Entered Racks page</b></i>: A list will be presented with rack names and the option to <b>Modify</b> or <b>Open</b> them. Click <b>Modify</b> if you want to edit a rack.<br><img style="position: relative; left: 20px; margin-top: 15px; margin-bottom: 15px; border-top: 1px solid #000000; border-left: 1px solid #000000; border-right: 2px solid #000000; border-bottom: 2px solid #000000; clear: both;" src="%ATTACHURLPATH%/edit_rack_spec_container_select.jpg" alt="Edit racks and specimens container select screen" title="Edit racks and specimens container select screen"></li> | ||
Revision as of 20:51, 19 December 2007
- As an administrator you have the ability to edit racks and specimens that have already been entered into the system. This is done through the Entered Racks feature.
Editing Active Racks
- Click the Entered Racks menu option under Maintenance. A list of containers will be displayed.
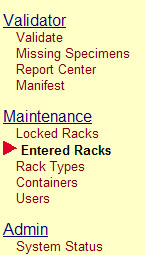 Edit racks and specimens menu
 - From here, you have two options. You may select a rack by clicking the container it resides in, or you may select the rack by typing its Rack ID in the top field and clicking Search.
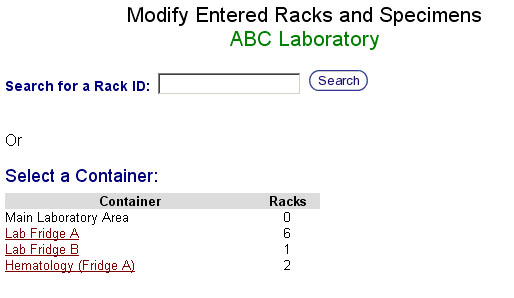 Edit racks and specimens start screen
 - Once you have chosen a container or entered a search, you will be presented with a list of racks. Note: if the search does not find a matching rack, no racks will be listed.


Selecting a rack to modify
- If you selected a container from the Entered Racks page: A list will be presented with rack names and the option to Modify or Open them. Click Modify if you want to edit a rack.
<img style="position: relative; left: 20px; margin-top: 15px; margin-bottom: 15px; border-top: 1px solid #000000; border-left: 1px solid #000000; border-right: 2px solid #000000; border-bottom: 2px solid #000000; clear: both;" src="%ATTACHURLPATH%/edit_rack_spec_container_select.jpg" alt="Edit racks and specimens container select screen" title="Edit racks and specimens container select screen"> - If you selected a rack by searching for its rack ID: A list will be presented with rack names found in the search. Click the rack name to modify that rack (same function as the Modify button).
<img style="position: relative; left: 20px; margin-top: 15px; margin-bottom: 15px; border-top: 1px solid #000000; border-left: 1px solid #000000; border-right: 2px solid #000000; border-bottom: 2px solid #000000; clear: both;" src="%ATTACHURLPATH%/edit_rack_spec_rack_search.jpg" alt="Edit racks and specimens rack ID search" title="Edit racks and specimens rack ID search">
</li>
<img style="position: relative; left: 20px; margin-top: 15px; margin-bottom: 15px; border-top: 1px solid #000000; border-left: 1px solid #000000; border-right: 2px solid #000000; border-bottom: 2px solid #000000; clear: both;" src="%ATTACHURLPATH%/edit_rack_spec_modify_rack_main.jpg" alt="Modify rack main screen" title="Modify rack main screen">
<img style="position: relative; left: 20px; margin-top: 15px; margin-bottom: 15px; border-top: 1px solid #000000; border-left: 1px solid #000000; border-right: 2px solid #000000; border-bottom: 2px solid #000000; clear: both;" src="%ATTACHURLPATH%/edit_rack_spec_rack_confirm.jpg" alt="Modify rack confirmation screen" title="Modify rack confirmation screen">
</ol>
---+++ Editing Active Specimens
- To edit a specimen you must first locate its rack. From the Entered Racks page type in its Rack ID or click on a container to browse for it.
- Once you have found your rack click the Open button. A list of the specimens in the rack will be displayed.
<img style="position: relative; left: 20px; margin-top: 15px; margin-bottom: 15px; border-top: 1px solid #000000; border-left: 1px solid #000000; border-right: 2px solid #000000; border-bottom: 2px solid #000000; clear: both;" src="%ATTACHURLPATH%/edit_rack_spec_rack_view.jpg" alt="Edit specimen rack view" title="Edit specimen rack view"> - To change the specimen ID for any one of these specimens, click on the Modify button next to its listing. A screen will be appear, much like the one shown before for editing Rack IDs, but here you change the Specimen ID of the given specimen.
<img style="position: relative; left: 20px; margin-top: 15px; margin-bottom: 15px; border-top: 1px solid #000000; border-left: 1px solid #000000; border-right: 2px solid #000000; border-bottom: 2px solid #000000; clear: both;" src="%ATTACHURLPATH%/edit_rack_spec_modify_spec_main.jpg" alt="Modify specimen main screen" title="Modify specimen main screen"> - Make sure to save any changes by clicking Update Spec ID when you are finished, or Cancel to cancel any changes.
- Clicking the Update Spec ID button will display the confirmation screen.
<img style="position: relative; left: 20px; margin-top: 15px; margin-bottom: 15px; border-top: 1px solid #000000; border-left: 1px solid #000000; border-right: 2px solid #000000; border-bottom: 2px solid #000000; clear: both;" src="%ATTACHURLPATH%/edit_rack_spec_modify_spec_confirm.jpg" alt="Modify specimen confirmation screen" title="Modify specimen confirmation screen"> - At this point you can attach a note to this modification event. Click the Add Note checkbox and the note text area will appear. Type the note into this area.
- Clicking Yes on this confirmation screen will apply the changes to the specimen ID and clicking No will cancel the operation.
Back to the Online Documentation