Difference between revisions of "Locked racks"
From Tubetracker
(New page: As an administrator you may be called to handle situations where a user cannot access a rack. One possible cause of failure is the rack may be locked. A rack is locked when a user who is w...) |
|||
| Line 1: | Line 1: | ||
| − | As an administrator you may be called to handle situations where a user cannot access a rack. One possible cause of failure is the rack may be locked. A rack is locked when a user who is working with the rack has not saved it or cancelled their changes. The system assumes the user is still working with the rack, and so locks it, preventing other users from accessing it. Administrators can easily unlock racks from the Locked Racks screen. | + | :As an administrator you may be called to handle situations where a user cannot access a rack. One possible cause of failure is the rack may be locked. A rack is locked when a user who is working with the rack has not saved it or cancelled their changes. The system assumes the user is still working with the rack, and so locks it, preventing other users from accessing it. Administrators can easily unlock racks from the Locked Racks screen. |
| − | + | '''CAUTION''': ''Make sure the user is not working with the rack when you unlock it!'' | |
| − | + | # To access the Locked Racks screen, click on '''Locked Racks''' under the '''Maintenance''' section of the left-hand menu and the Locked Racks screen will appear.[[image:locked_racks_menu.jpg|left|frame|'''Locked racks menu''']]<br clear="all" /> | |
| − | + | # This screen displays a list of racks currently locked as well as the Rack ID, date and time when it was locked and what the user was doing when they locked the rack. Click the checkboxes to the left of the racks you wish to unlock and click Unlock Racks to unlock those racks.<br />Alternatively, by clicking on the check box at the top left of the list (to the left of User), you can select all racks at once. Only do this if you are sure that no one is actually using them.[[image:locked_racks_main.jpg|left|frame|'''Locked racks main screen''']]<br clear="all" /> | |
| − | + | # A Confirmation screen will appear. Make sure that all of the racks that are listed are the ones you wish to unlock and then click '''Yes'''.[[image:locked_racks_confirm.jpg|left|frame|'''Unlock rack confirmation screen''']]<br clear="all" /> | |
| − | + | # After clicking '''Yes''' or '''No''', you will be returned to the Locked Racks screen and any racks you selected will be unlocked (assuming you clicked on Yes). This means that any user will be able to work with these racks again. | |
| − | |||
| − | |||
Back to the [[Online Documentation]] | Back to the [[Online Documentation]] | ||
Revision as of 20:47, 19 December 2007
- As an administrator you may be called to handle situations where a user cannot access a rack. One possible cause of failure is the rack may be locked. A rack is locked when a user who is working with the rack has not saved it or cancelled their changes. The system assumes the user is still working with the rack, and so locks it, preventing other users from accessing it. Administrators can easily unlock racks from the Locked Racks screen.
CAUTION: Make sure the user is not working with the rack when you unlock it!
- To access the Locked Racks screen, click on Locked Racks under the Maintenance section of the left-hand menu and the Locked Racks screen will appear.
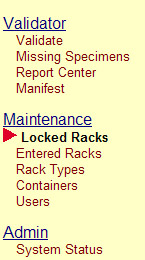 Locked racks menu
 - This screen displays a list of racks currently locked as well as the Rack ID, date and time when it was locked and what the user was doing when they locked the rack. Click the checkboxes to the left of the racks you wish to unlock and click Unlock Racks to unlock those racks.
Alternatively, by clicking on the check box at the top left of the list (to the left of User), you can select all racks at once. Only do this if you are sure that no one is actually using them.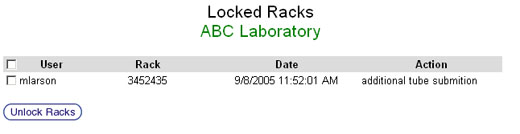 Locked racks main screen
 - A Confirmation screen will appear. Make sure that all of the racks that are listed are the ones you wish to unlock and then click Yes.
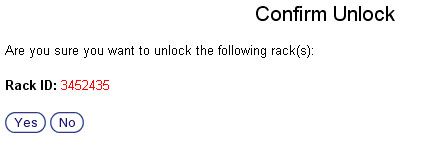 Unlock rack confirmation screen
 - After clicking Yes or No, you will be returned to the Locked Racks screen and any racks you selected will be unlocked (assuming you clicked on Yes). This means that any user will be able to work with these racks again.


Back to the Online Documentation