Difference between revisions of "Managing user accounts"
From Tubetracker
(New page: As an administrator, you have the ability to edit users' settings. For example, you can change the default container they add racks to, or reset their password. <ol> <li>To work with user...) |
(→Adding a New Account) |
||
| (19 intermediate revisions by the same user not shown) | |||
| Line 1: | Line 1: | ||
| − | + | :Administrators have the ability to edit user settings. For example, the default container a user adds racks to or a password can be changed. | |
| − | + | ||
| − | + | ||
| − | + | == Opening the User Maintenance Screen == | |
| − | + | ||
| − | + | # Click '''Users''' in the Navigation Menu under '''Maintenance'''.[[image:manage_user_menu.jpg|none|frame|'''Navigation Menu<br/>Maintenance > Users''']]<br clear="all" /> | |
| − | + | # The User Maintenance Screen will appear displaying a list of users and each user's current status. From this screen, user accounts can be added, deleted, and edited.[[image:manage_user_account_listing.jpg|none|frame|'''User Maintenance Screen''']]<br clear="all" /> | |
| − | + | ||
| − | + | ||
| − | + | == Adding a New Account == | |
| − | + | ||
| − | + | # Locate the '''Add New Account''' section at the bottom of the User Maintenance Screen.[[image:manage_user_new_account_form.jpg|none|frame|'''Add New Account Section''']]<br clear="all" /> | |
| − | + | # Enter the information for the new account into the corresponding areas as described below: | |
| − | < | + | ## '''Level''': The set of rights available to a user. |
| − | + | ##* ''Administrator'' has full access to the tube.tracker system including the ability to change settings. | |
| − | + | ##* ''Normal User'' may add specimens and racks, but may not edit containers, rack types, or user preferences. | |
| − | + | ##* ''Query Only'' may view specimens and racks currently in the system; changing specimens and racks is prohibited. | |
| − | + | ##* ''Single Container'' has Normal User level rights but only to a selected container. | |
| − | + | <!-- ##* ''Multi Container'' has Normal User level rights but only to a selected list of containers.--> | |
| − | + | ## '''Login''': The user name with which the user will log in. | |
| − | + | ## '''Password''': The password with which the user will log in. The login and the password must be kept on record for the user to log in. There is default minimum tube.tracker password length of 2 characters. | |
| − | + | ## '''First Name''': First name of the user. | |
| − | + | ## '''Last Name''': Last name of the user. | |
| − | + | ## '''Department''': Department in which this user works. | |
| − | </ | + | # Click the '''Add New User''' button to create the new user as specified. The User Maintenance Screen will refresh and the new user will be displayed under the appropriate user level category.[[image:manage_user_account_listing.jpg|none|frame|'''User Maintenance Screen<br/>Account Listings''']]<br clear="all" /> |
| − | + | ||
| − | + | == Deleting an Account == | |
| − | + | ||
| − | + | # Locate the user account to be deleted in the User Maintenance Screen.[[image:manage_user_account_listing.jpg|none|frame|'''User Maintenance<br/>Account Listings''']]<br clear="all" /> | |
| − | + | # Click the '''Delete''' button corresponding to the user. | |
| − | + | # The User Deletion Confirmation Screen will appear.[[image:manage_user_delete_confirmation.jpg|none|frame|'''Delete user account confirmation screen''']]<br clear="all" /> | |
| − | + | # Ensure that the name displayed is the name of the account to be deleted. | |
| − | + | # Click the '''Yes''' button to delete the account. Click the '''No''' button to returns to the User Maintenance Screen. When a user account is deleted, it will no longer be possible to log in with that user name. | |
| − | + | ||
| − | + | ||
| − | + | == Editing an Existing Account == | |
| − | + | ||
| − | + | # Locate the user account to be edited in the User Maintenance Screen | |
| − | + | # Click the '''Edit''' button corresponding to the user account | |
| − | + | # The '''Login Account Editing Screen''' will appear. [[image:manage_user_edit_user.jpg|none|frame|'''Login Account Editing Screen''']]<br clear="all" /> | |
| − | + | # The Login Account Editing Screen has two sections: | |
| − | + | ## Account Password Management | |
| − | + | ##* '''Password''': The current password for the user will be displayed. Change the password by changing what appears in this box. Password rules will be ignored if they are enabled for the institution. There is default minimum tube.tracker password length of 2 characters. | |
| − | + | ##* '''Expire Date''': The date that the user's password will expire at which time it will need to be changed. Leave the field blank if no expiration date is desired for the account. | |
| − | + | ##* '''Change on next login''': Click the check box to force the user to change their password at the next login. | |
| − | + | ## Basic Account Information | |
| − | + | ##* '''Level''': The set of rights available to a user. Refer to [[Managing_user_accounts#Adding a New Account|Adding a New Account]] section for more information on user levels. | |
| − | + | ##* '''Login''': The user name with which the user will log in. | |
| − | + | ##* '''First Name''': First name of the user. | |
| − | + | ##* '''Last Name''': Last name of the user. | |
| − | + | ##* '''Department''': Department in which this user works. | |
| − | + | ##* '''Default Container''': The container which will be pre-selected when a new rack is added to the system. In the case of a Single Container user, this is the only container in which the user will be allowed to view and add racks. | |
| − | + | ##* '''Default rack type''': The rack type which will be pre-selected when a new rack is added to the system. | |
| − | + | ##* '''Default expire date''': The number of days after which a rack added by this user will expire. This setting is usually overridden by the expire date for the container in which the new rack is added. | |
| − | + | ##* '''Show expired racks by default''': The default view when entering the Rack Maintenance Screen. When this box is checked, the default view will show only expired racks. | |
| − | + | ##* '''Force container selection''': The user will manually select the destination container for any new racks. | |
| − | + | ##* '''Use container capacity''': This user account will be limited to adding new racks to containers that are not at or above capacity. The container capacity must be set to a number greater than or equal to one for this feature to be enabled. | |
| − | + | ##* '''Force open rack notes''': Will force open the notes area when adding new racks. | |
| + | ##* '''Force open specimen notes''': Will force open the notes area when adding new specimens. | ||
| + | ##* '''Can view options screen''': Determines whether or not user can access the options screen. | ||
| + | ##* '''Show Missing Specimens On Home''': Will display a list of Missing Specimens on the Welcome Screen. | ||
| + | ##* '''Can unlock racks''': Allows the user account to administratively unlock racks. | ||
| + | |||
Back to the [[Online Documentation]] | Back to the [[Online Documentation]] | ||
Latest revision as of 18:22, 4 February 2014
- Administrators have the ability to edit user settings. For example, the default container a user adds racks to or a password can be changed.
Contents
Opening the User Maintenance Screen
- Click Users in the Navigation Menu under Maintenance.
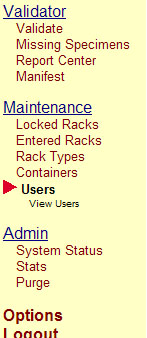 Navigation Menu
Maintenance > Users - The User Maintenance Screen will appear displaying a list of users and each user's current status. From this screen, user accounts can be added, deleted, and edited.
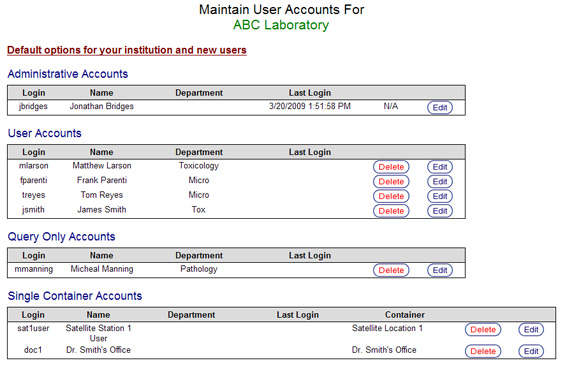 User Maintenance Screen


Adding a New Account
- Locate the Add New Account section at the bottom of the User Maintenance Screen.
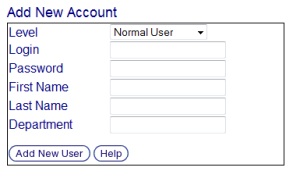 Add New Account Section
 - Enter the information for the new account into the corresponding areas as described below:
- Level: The set of rights available to a user.
- Administrator has full access to the tube.tracker system including the ability to change settings.
- Normal User may add specimens and racks, but may not edit containers, rack types, or user preferences.
- Query Only may view specimens and racks currently in the system; changing specimens and racks is prohibited.
- Single Container has Normal User level rights but only to a selected container.
- Login: The user name with which the user will log in.
- Password: The password with which the user will log in. The login and the password must be kept on record for the user to log in. There is default minimum tube.tracker password length of 2 characters.
- First Name: First name of the user.
- Last Name: Last name of the user.
- Department: Department in which this user works.
- Level: The set of rights available to a user.
- Click the Add New User button to create the new user as specified. The User Maintenance Screen will refresh and the new user will be displayed under the appropriate user level category. User Maintenance Screen
Account Listings

Deleting an Account
- Locate the user account to be deleted in the User Maintenance Screen. User Maintenance
Account Listings - Click the Delete button corresponding to the user.
- The User Deletion Confirmation Screen will appear.
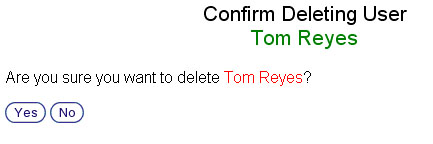 Delete user account confirmation screen
 - Ensure that the name displayed is the name of the account to be deleted.
- Click the Yes button to delete the account. Click the No button to returns to the User Maintenance Screen. When a user account is deleted, it will no longer be possible to log in with that user name.

Editing an Existing Account
- Locate the user account to be edited in the User Maintenance Screen
- Click the Edit button corresponding to the user account
- The Login Account Editing Screen will appear.
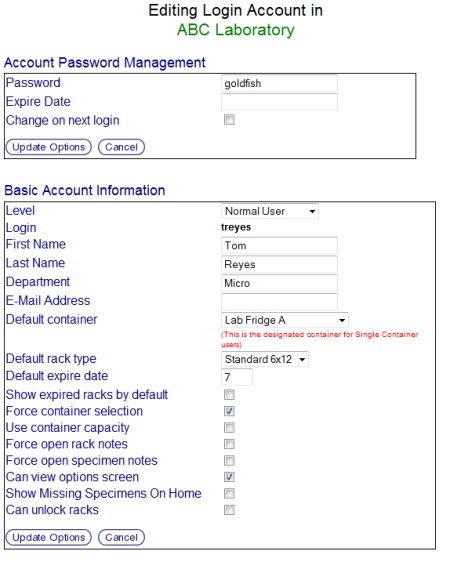 Login Account Editing Screen
 - The Login Account Editing Screen has two sections:
- Account Password Management
- Password: The current password for the user will be displayed. Change the password by changing what appears in this box. Password rules will be ignored if they are enabled for the institution. There is default minimum tube.tracker password length of 2 characters.
- Expire Date: The date that the user's password will expire at which time it will need to be changed. Leave the field blank if no expiration date is desired for the account.
- Change on next login: Click the check box to force the user to change their password at the next login.
- Basic Account Information
- Level: The set of rights available to a user. Refer to Adding a New Account section for more information on user levels.
- Login: The user name with which the user will log in.
- First Name: First name of the user.
- Last Name: Last name of the user.
- Department: Department in which this user works.
- Default Container: The container which will be pre-selected when a new rack is added to the system. In the case of a Single Container user, this is the only container in which the user will be allowed to view and add racks.
- Default rack type: The rack type which will be pre-selected when a new rack is added to the system.
- Default expire date: The number of days after which a rack added by this user will expire. This setting is usually overridden by the expire date for the container in which the new rack is added.
- Show expired racks by default: The default view when entering the Rack Maintenance Screen. When this box is checked, the default view will show only expired racks.
- Force container selection: The user will manually select the destination container for any new racks.
- Use container capacity: This user account will be limited to adding new racks to containers that are not at or above capacity. The container capacity must be set to a number greater than or equal to one for this feature to be enabled.
- Force open rack notes: Will force open the notes area when adding new racks.
- Force open specimen notes: Will force open the notes area when adding new specimens.
- Can view options screen: Determines whether or not user can access the options screen.
- Show Missing Specimens On Home: Will display a list of Missing Specimens on the Welcome Screen.
- Can unlock racks: Allows the user account to administratively unlock racks.
- Account Password Management

Back to the Online Documentation