Difference between revisions of "Manifest"
From Tubetracker
m (Fixed Image Alignment) |
|||
| Line 1: | Line 1: | ||
| − | :The manifest is a useful tool that will display a printable list of specimens from a rack or container. This manifest printout can then be sent along with the rack or container for use in | + | :The manifest is a useful tool that will display a printable list of specimens from a rack or container. This manifest printout can then be sent along with the rack or container for use in validating the physical specimens. |
| − | # Click '''Manifest''' in the | + | # Click '''Manifest''' in the Navigation Menu under the heading '''Validation'''.[[image:manifest_menu.jpg|none|frame|'''Navigation Menu<br/>Validation > Manifest''']]<br clear="all" /> |
| − | # The Container Selection screen will | + | # The Container Selection screen will appear.[[image:manifest_main.jpg|none|frame|'''Manifest select container screen''']]<br clear="all" /> |
| − | # | + | # Select a container from this screen by clicking on its name. |
| − | #* '' | + | # The Rack Selection screen will appear.[[image:manifest_rack_select.jpg|none|frame|'''Manifest select rack screen''']]<br clear="all" /> |
| − | #* '' | + | # Two types of manifests can be displayed from this screen: |
| − | # | + | #* ''Container manifest'' will be displayed by clicking the Display manifest for the entire container link at the top of the page.[[image:manifest_container_manifest.jpg|none|frame|'''Container Manifest''']]<br clear="all" /> |
| − | # The specimen listing | + | #* ''Rack manifest'' will be displayed by clicking the Rack ID link of the desired rack.[[image:manifest_rack_manifest.jpg|none|frame|'''Rack Manifest''']]<br clear="all" /> |
| − | ## ''' | + | #* Both Container and Rack manifests show the Rack ID(s) and Specimen Count(s) of the selected rack(s). |
| − | ## '''Spec ID''' | + | # The specimen listing for a rack displays the following information in column form: |
| − | ## '''Entered''' | + | ## '''Position''' displays the position in the rack where the specimen resides. |
| − | ## '''Note''' | + | ## '''Spec ID''' displays the ID of the specimen. |
| − | # | + | ## '''Entered''' displays the date and time when the specimen was entered into the rack. |
| + | ## '''Note''' displays any note attached to the specimen during entry. | ||
| + | # Print a manifest by clicking the '''Print Manifest''' button at the top of the page. This will open a new window that display a printer friendly version of the manifest and opens the print dialog. | ||
Back to the [[Online Documentation]] | Back to the [[Online Documentation]] | ||
Revision as of 21:03, 27 December 2013
- The manifest is a useful tool that will display a printable list of specimens from a rack or container. This manifest printout can then be sent along with the rack or container for use in validating the physical specimens.
- Click Manifest in the Navigation Menu under the heading Validation.
 Navigation Menu
Validation > Manifest - The Container Selection screen will appear.
 Manifest select container screen
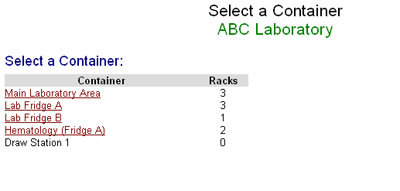
 - Select a container from this screen by clicking on its name.
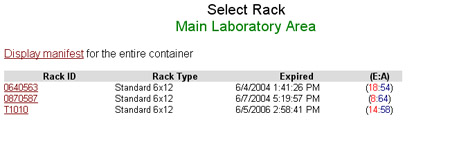
- The Rack Selection screen will appear.
 Manifest select rack screen
 - Two types of manifests can be displayed from this screen:
- Container manifest will be displayed by clicking the Display manifest for the entire container link at the top of the page.
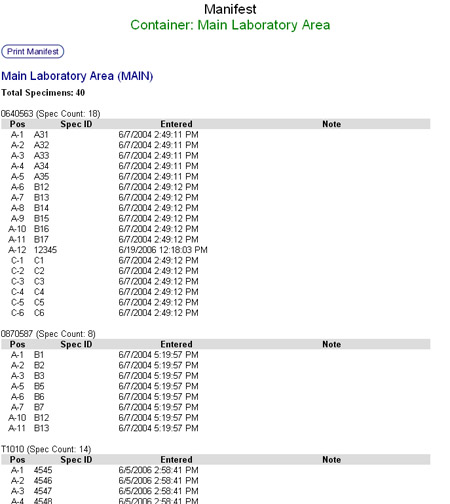 Container Manifest
 - Rack manifest will be displayed by clicking the Rack ID link of the desired rack.
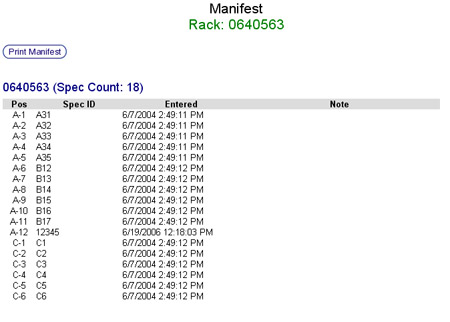 Rack Manifest
 - Both Container and Rack manifests show the Rack ID(s) and Specimen Count(s) of the selected rack(s).
- Container manifest will be displayed by clicking the Display manifest for the entire container link at the top of the page.
- The specimen listing for a rack displays the following information in column form:
- Position displays the position in the rack where the specimen resides.
- Spec ID displays the ID of the specimen.
- Entered displays the date and time when the specimen was entered into the rack.
- Note displays any note attached to the specimen during entry.
- Print a manifest by clicking the Print Manifest button at the top of the page. This will open a new window that display a printer friendly version of the manifest and opens the print dialog.


Back to the Online Documentation