Rack and container validation
From Tubetracker
Contents
Starting the validation process
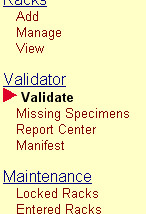
- Click Validate in the Navigation Menu under the Validator heading
 Navigation Menu
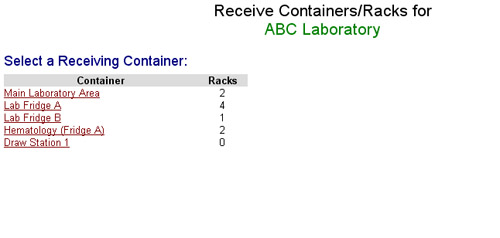
Validator > Validate - The Select a Receiving Container screen will appear:
 Validator Receive Container/Rack screen
 - Click a container name to designate a receiving container that will accept validated racks and/or containers.
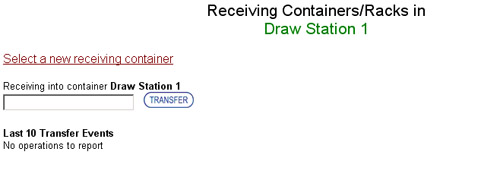 Validator rack and container search screen
 - The rack and container search screen will appear. This screen has three sections:
 Search box
- Select a new receiving container link will return to the Select a Receiving Container screen where a new receiving container can be specified.
- Rack and Container search box is where the Rack ID or Container ID being validated will be typed or scanned in.
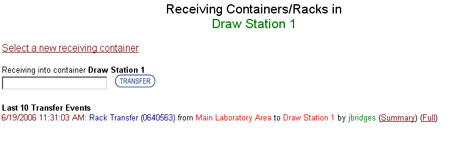
- Last 10 Transfer Events area shows the last 10 transfer events for the currently selected receiving container. If there are transfer events shown in this area and the Select a new receiving container link is clicked, those events will no longer be present upon returning to this screen.</li>
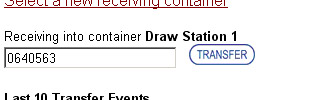
- Type or scan a Rack ID or Container ID into the search box.
- If the search found multiple matches, a list of the results will appear. Select the appropriate rack or container from this list by clicking on its ID which will load the rack or container in the Validation screen.
- If the search found only one match, the Validation screen will appear with the rack or container loaded in.
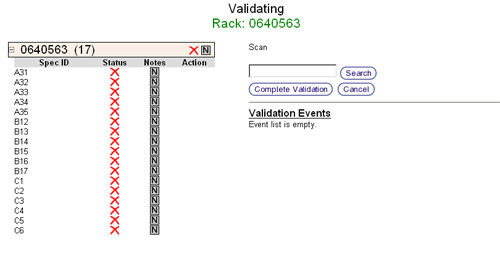 Validation screen
- The Validation screen is segregated into three sections:
- Specimen listing is the area in which the containers, racks and specimens are listed for validation.
- Validation scan box is a text box where Specimen IDs or Rack IDs will be scanned in for validation and navigation.
- Validation Events area serves three purposes:
- Displays the last 10 validation events. Validation events include validating a specimen, validating a whole rack of specimens, and adding notes to specimen.
- Displays the specimen history and current information when a Specimen ID is clicked in the Specimen Listing area.
- Adding and viewing notes for specimens, racks and containers. By clicking on the note icon for a specimen, rack or container, any previous notes will be displayed as well as giving you the opportunity to add a validation note.


Validating a specimen, rack, or container
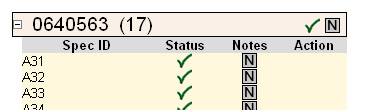
The Validation Screen denotes specimens that have been validated with a validation icon. The validation icon will either be a green check mark or a red X.
Specimens have not been validated

Specimen A31 has been validated
There are three ways in which a specimen can be validated.
- Scan or type the specimen ID into the validation scan box.
- When Validating a single rack, tube.tracker will search the rack for a matching specimen ID.
- If a match is found, the specimen is marked as validated.
- If no match is found and the rack is not filled, a new specimen is added to the rack with the ID that was typed in the search box.
- When Validating a container, all of the racks in the container are displayed, however, only one rack at a time can be selected to display its specimens for searching. When the Search button is pressed, the search string will be sought differently than when validating a single rack to anticipate the users intentions:
- A search of Specimen IDs is performed on the currently selected rack to determine if there is a matching specimen ID.
- If a match is found, the specimen is marked as validated. Other specimens in the same rack can easily be validated next.
- If no match is found, the validator will check to see if the search string is a either new specimen in the rack that needs to be added or an existing ID for a rack that should be selected for validation.
- If the search string matches a Rack ID in the currently selected container, a dialog will appear. Click the OK button to select the rack that matches the search string. Click the Cancel button to create a new specimen in the current rack with the search string as its Specimen ID.
- If the search string does not match a Rack ID and the currently selected rack is not at capacity, the validator will add a new specimen to the currently selected rack with the search string as the Specimen ID.
- A search of Specimen IDs is performed on the currently selected rack to determine if there is a matching specimen ID.
- When Validating a single rack, tube.tracker will search the rack for a matching specimen ID.
- Click the validation icon for an an entire rack or container.
- While a specimen's validation icon is in the Status column, each rack and container may have its own validation icon displayed to the right of its ID as long as it is permitted by institution policy. Clicking the validation icon for a rack or container will mark every specimen contained within as validated.
 Entire rack has been validated
 - If there is no visible validation icon for racks and containers as shown below, administrators have disabled this feature using the Force individual specimen validation institution-wide setting. Each specimen must be validated individually using the next step.
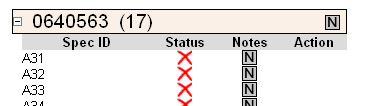 Force individual specimen validation option has been enabled
- While a specimen's validation icon is in the Status column, each rack and container may have its own validation icon displayed to the right of its ID as long as it is permitted by institution policy. Clicking the validation icon for a rack or container will mark every specimen contained within as validated.
- Click the validation icon for each specimen. When the specimen's status is changed to validated, the red X validation icon will change to a green check mark and the specimen entry will be highlighted by changing its background color to tan.


Managing validation notes
- The validation process affords the user many opportunities to add notes to specimens, racks and containers. The state of a specimen, rack or container note can be determined by a quick glance at the Note icon. The Note icon for a rack and container will appear in the header and be located on the extreme right and the Note icon for a specimen will appear in the Notes column. There are four possible note states which we will merge into two groups.
- Previous Notes: A specimen, rack or container will either have notes attached to them previously or they will not. This can quickly be determined by the color of the Note icon.
- Previous notes are present: If a note was attached at any point in the past, the note icon will appear as a white square with a black N.
- No previous notes: If no notes have ever been attached then the note icon will appear as a gray square with a black N.
- Validation Note: A validation note is a note that has been attached to an object (specimen, rack or container) during the current validation. Once you complete the validation, any new notes added will then be considered a previous note.
- No validation note: If no validation note has yet been attached, the note icon's appearance will then be determined by their previous notes status.
- Validation note exists: Once a validation note has been attached, the icon's color will change to white (if it is not already white) and a red plus sign will appear in the upper right-hand corner.
Adding a validation note
- Adding a validation note to a specimen, rack or container is very simple.
- Click on the note icon.
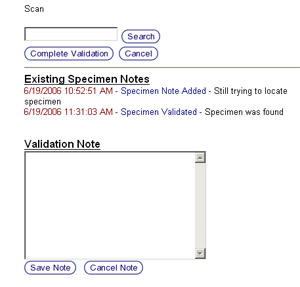 Validator note section
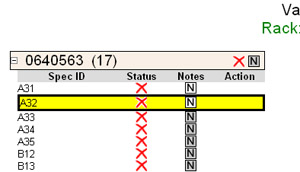 Currently adding a note to a specimen
 - Once the note icon has been clicked, several things happen.
- The Validation Events area of the validation page will change to show the notes area. If any previous notes are present, they will be shown in the top portion of the area. Below the previous notes section is the validation notes section.
- The object receiving the validation note will change appearance. The background color will turn yellow and will be outlined with a heavy black border.
- The validation note is now ready to be typed in.
- After the validation note has been entered you can either click the Save Note button, or use the shortcut key Ctrl-Q to save the note. If you find that you do not want to add a validation note at this time, click the Cancel Note button.


View, modify or clear a validation note
- After a validation note has been added, you may wish to view the note, make changes to the note, or remove the note.
- Click the Note icon for the specimen, rack or container you wish to modify or clear.
- After clicking the Note icon, the current validation note will appear in the Note section.
- Viewing validation note: The validation note is currently displayed in the Note section. After you are done viewing it, click the Cancel Note button.
- Modify validation note: If you are modifying the note, make the appropriate changes to the note and click the Save Note button.
- Clearing validation note: The validation note can be cleared by either clicking the Clear Note button, or deleting the current validation note and clicking the Save Note button.
Completing the validation process
- Once all of the specimens in the rack or container have been validated it is time to complete the validation and transfer the rack to the receiving container.
- Click the Complete Validation button.
 Rack and container search screen after a successful validation
 - Once the validation has been submitted to tube.tracker, the rack and container search screen will appear. There will be a new entry in the Last 10 Transfer Events section of the page. This entry will list the time of the transfer, what was transferred and where it was transferred. There will also be two links at the end of the entry that will display the Summary Report for the validation and the Full Report for the validation. Clicking on either of these links will create a new window and display the report. The report can then be printed if so desired.

Back to the Online Documentation