Renewing expired racks
From Tubetracker
Keep an expired rack past its expiration date by renewing the rack and assigning it a new expiration date.
- Click Manage located under Racks in the left navigation area. A container selection page will be displayed.
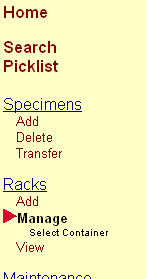 Manage racks menu
 Container Selection Screen
 - Click on the link for a Container to display its expired racks of specimens. Containers that have no racks will not be displayed as a clickable link and will instead be displayed as text. In the example below, Main Laboratory has no racks and so cannot be selected while Lab Fridge A has racks and can be selected.
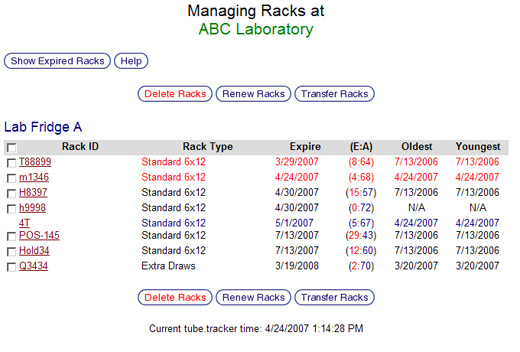
- The Managing Rack page shown below will be displayed. Depending on user preference settings, either all racks or just expired racks will be displayed. Racks are sorted by expiration date and the information about each rack, such as Rack Type and Expiration Date, is color coded for quick reference.
- Expired rack's information is displayed in red
- Active rack's information is displayed in black
- Locked rack's information is displayed in blue
- There are two filters for displaying a container's racks called Show All Racks and Show Expired Racks. All of the racks in the example below, with the exception of rack 4T, are expired. Clicking on Show Expired Racks will reload the page filtering out rack 4T. On that page will be a Show All Racks button will reload the page displaying all racks including 4T. For periodic, maintenance rack dumps, it is recommended to display only expired racks.
 Managing Racks
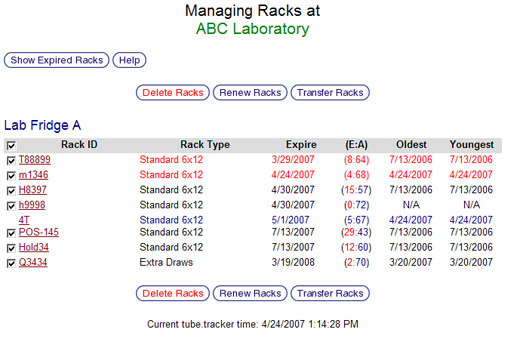
Container rack listing
- The Managing Rack page shown below will be displayed. Depending on user preference settings, either all racks or just expired racks will be displayed. Racks are sorted by expiration date and the information about each rack, such as Rack Type and Expiration Date, is color coded for quick reference.
- Click the check boxes to the left of the Rack IDs of racks to be renewed. Select all of the racks by clicking the check box to the left of the Rack ID column heading.
- Click the Renew Racks button once all of the racks being renewed have been selected.
 Manage racks container rack listing with check marks
 - Review the racks that have been selected for renewal. If a rack has been selected that should not have, click the Cancel Renew button to return to the previous screen to select different racks. If the list of racks selected is correct, continue to the next step.
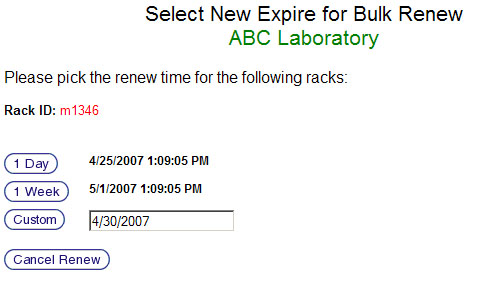 Renew rack main screen
 - Select the new expiration date for the selected racks by using any of the following options:
- Click the 1 Day button to set the racks to expire one day from now.
- Click the 1 Week button to set the racks to expire one week from now.
- Enter a specific day for the racks to expire and click the Custom button.
- The Confirm Bulk Renew of Racks displays the new expiration date, the list of selected racks, and the Add Note check box.
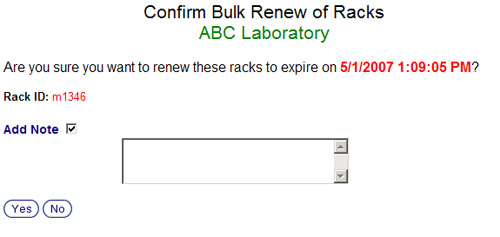 Renew rack confirmation screen
 - Click the Add Note check box to add a note for this event if desired.
- Click the Yes button to confirm the new expiration date for the selected racks. Click the No button cancel the new expiration date. Clicking either button will return to the rack selection page.


Back to the Online Documentation