Difference between revisions of "Transferring racks between storage containers"
From Tubetracker
| Line 1: | Line 1: | ||
| − | # Click '''Manage''' | + | == Opening the Rack Management - Container Selection Screen == |
| − | # Click on | + | |
| − | # | + | # Click '''Manage''' in the Navigation Menu under the heading '''Racks'''.[[image:manage_rack_menu.jpg|none|frame|'''Navigation Menu <br/>Racks > Manage''']]<br/> |
| − | #** Expired rack's information is displayed in <span style="color: #FF0000;">'''red'''</span> | + | # The Rack Management - Container Selection Screen will be displayed. This screen contains a list of containers and a link that will display a screen showing all expired racks in all containers. The Container Name for each of the containers in the list will be a clickable link.[[image:manage_rack_start.jpg|none|frame|'''Rack Management - Container Selection Screen''']]<br clear="all" /> |
| − | #** Active rack's information is displayed in '''black''' | + | |
| − | #** Locked rack's information is displayed in <span style="color: #000080;">'''blue'''</span> | + | |
| − | # | + | == Locating Racks Being Transferred == |
| − | # Click the | + | |
| − | + | # Click on the '''Container Name Link''' corresponding to the container in which the racks being renewed reside. | |
| − | # The | + | # The '''Rack Management - Rack Selection Screen''' will be displayed listing all of the racks currently residing in the selected container with all pertinent information on each rack in the container.[[image:manage_rack_container_rack_listing.jpg|none|frame|'''Rack Management - Rack Selection Screen''']]<br clear="all" /> |
| − | + | #* Racks are sorted by expiration date and the information about each rack, such as Rack Type and Expiration Date, is color coded for quick reference. | |
| − | # | + | #** Expired rack's information is displayed in <span style="color: #FF0000;">'''red text'''</span>. |
| − | # Click the '''Add Note''' | + | #** Active rack's information is displayed in '''black text'''. |
| − | # Click the '''Yes''' | + | #** Locked rack's information is displayed in <span style="color: #000080;">'''blue text'''</span>. |
| + | # Select the check boxes corresponding to the racks being renewed. | ||
| + | # Click the '''Renew Racks Button''' to renew the selected racks. | ||
| + | # The '''Rack Transfer Container Selection Screen''' will display showing a list of all containers with the Container Name for an available container being a clickable link. The Container Name of the source container will be displayed in bold black text with "(Source Container)" next to it. Any container that is at capacity will be displayed in bold red text with "(Transfer will exceed capacity)" next to it. Administrators can enable and disable container capacities.[[image:transfer_rack_select_destination.jpg|none|frame|'''Rack Transfer Container Selection Screen''']]<br clear="all" /> | ||
| + | # Click the Container Name Link corresponding to the desired destination container for the rack being transferred. Click the '''Cancel Transfer Button''' button to cancel the transfer and return to the '''Rack Management - Rack Selection Screen'''. | ||
| + | # The '''Rack Transfer Confirmation Screen''' will be displayed showing the source container, destination container, list of racks being transferred, and the '''Add Note Check Box'''.[[image:transfer_rack_confirm.jpg|none|frame|'''Rack Transfer Confirmation Screen''']]<br clear="all" /> | ||
| + | # Ensure that the correct source container, destination container, and list of racks being transferred are displayed. If any of the information is incorrect, Click the '''No Button''' to return to the '''Rack Management - Rack Selection Screen'''. | ||
| + | # Click the '''Add Note Check Box''' to display the '''Add Note Text Box''' in which a note about this transfer can be entered if desired. | ||
| + | # Click the '''Yes Button''' to transfer the racks into the selected container and to return to the '''Rack Management - Rack Selection Screen'''. | ||
Back to the [[Online Documentation]] | Back to the [[Online Documentation]] | ||
Revision as of 21:56, 10 January 2014
Opening the Rack Management - Container Selection Screen
- Click Manage in the Navigation Menu under the heading Racks.
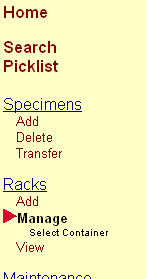 Navigation Menu
Racks > Manage - The Rack Management - Container Selection Screen will be displayed. This screen contains a list of containers and a link that will display a screen showing all expired racks in all containers. The Container Name for each of the containers in the list will be a clickable link.
 Rack Management - Container Selection Screen


Locating Racks Being Transferred
- Click on the Container Name Link corresponding to the container in which the racks being renewed reside.
- The Rack Management - Rack Selection Screen will be displayed listing all of the racks currently residing in the selected container with all pertinent information on each rack in the container.
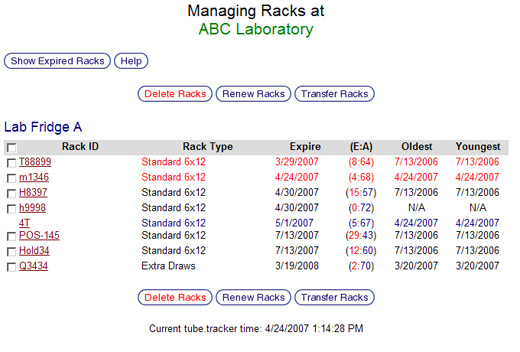 Rack Management - Rack Selection Screen
- Racks are sorted by expiration date and the information about each rack, such as Rack Type and Expiration Date, is color coded for quick reference.
- Expired rack's information is displayed in red text.
- Active rack's information is displayed in black text.
- Locked rack's information is displayed in blue text.
- Racks are sorted by expiration date and the information about each rack, such as Rack Type and Expiration Date, is color coded for quick reference.
- Select the check boxes corresponding to the racks being renewed.
- Click the Renew Racks Button to renew the selected racks.
- The Rack Transfer Container Selection Screen will display showing a list of all containers with the Container Name for an available container being a clickable link. The Container Name of the source container will be displayed in bold black text with "(Source Container)" next to it. Any container that is at capacity will be displayed in bold red text with "(Transfer will exceed capacity)" next to it. Administrators can enable and disable container capacities.
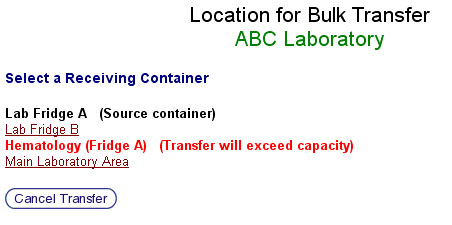 Rack Transfer Container Selection Screen
 - Click the Container Name Link corresponding to the desired destination container for the rack being transferred. Click the Cancel Transfer Button button to cancel the transfer and return to the Rack Management - Rack Selection Screen.
- The Rack Transfer Confirmation Screen will be displayed showing the source container, destination container, list of racks being transferred, and the Add Note Check Box.
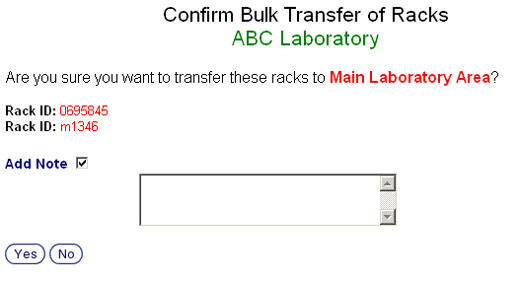 Rack Transfer Confirmation Screen
 - Ensure that the correct source container, destination container, and list of racks being transferred are displayed. If any of the information is incorrect, Click the No Button to return to the Rack Management - Rack Selection Screen.
- Click the Add Note Check Box to display the Add Note Text Box in which a note about this transfer can be entered if desired.
- Click the Yes Button to transfer the racks into the selected container and to return to the Rack Management - Rack Selection Screen.

Back to the Online Documentation