Difference between revisions of "Transferring racks between storage containers"
From Tubetracker
(New page: <ol> <li>Since the beginning steps of transfering a rack are common to other tube.tracker® functions, follow the opening steps to [[DeleteRack][discarding a rack of specimens]].</li>...) |
|||
| Line 1: | Line 1: | ||
| − | + | # Since the beginning steps of transfering a rack are common to other tube.tracker® functions, follow the opening steps to [[Discard_a_rack_of_specimens|discarding a rack of specimens]]. | |
| − | + | # Once you have opened the container in which the rack you wish to trasfer resides, click the checkbox associated with the rack. '''Note''': ''you may select more than one rack to trasfer at a time.'' | |
| − | + | # After you have all of the racks you wish to transfer selected, click the '''Transfer Racks''' button.[[image:transfer_rack_select_destination.jpg|left|frame|'''Transfer rack select destination screen''']]<br clear="all" /> | |
| − | + | # This screen will display the list of available containers. You will notice that there are two containers that you may not select. The first container ''Lab Fridge A'' is not available because it is the source container of the racks you are transfering. The third container ''Hematology (Fridge A)'' is also not available because transfering these racks will excede the capacity of the container. '''Note''': ''This container would be available if this user did not have the container capacity check enabled.'' | |
| − | + | # To continue the transfer process, click the container name you wish to transfer that racks into. If you wish to cancel the transfer process, click the '''Cancel Transfer''' button.[[image:transfer_rack_confirm.jpg|left|frame|'''Transfer rack confirmation screen''']]<br clear="all" /> | |
| − | + | # At this point you can attach a note to this event. To attach a note, click the '''Add Note''' checkbox and the note text area will appear. Type the note into this space. | |
| − | + | # Clicking '''Yes''' will transfer each rack into the selected container. Clicking '''No''' will cancel the transfer and take you back to the manage racks screen. | |
| − | |||
| − | |||
| − | |||
Back to the [[Online Documentation]] | Back to the [[Online Documentation]] | ||
Revision as of 19:57, 19 December 2007
- Since the beginning steps of transfering a rack are common to other tube.tracker® functions, follow the opening steps to discarding a rack of specimens.
- Once you have opened the container in which the rack you wish to trasfer resides, click the checkbox associated with the rack. Note: you may select more than one rack to trasfer at a time.
- After you have all of the racks you wish to transfer selected, click the Transfer Racks button.
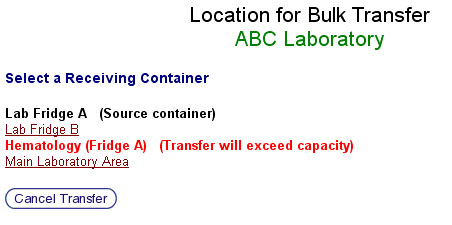 Transfer rack select destination screen
 - This screen will display the list of available containers. You will notice that there are two containers that you may not select. The first container Lab Fridge A is not available because it is the source container of the racks you are transfering. The third container Hematology (Fridge A) is also not available because transfering these racks will excede the capacity of the container. Note: This container would be available if this user did not have the container capacity check enabled.
- To continue the transfer process, click the container name you wish to transfer that racks into. If you wish to cancel the transfer process, click the Cancel Transfer button.
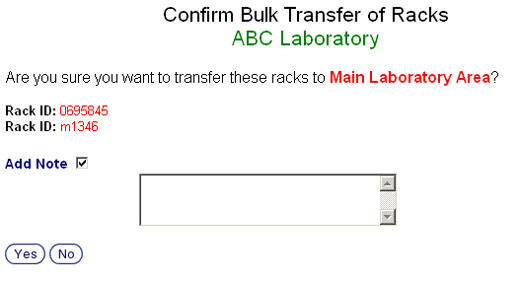 Transfer rack confirmation screen
 - At this point you can attach a note to this event. To attach a note, click the Add Note checkbox and the note text area will appear. Type the note into this space.
- Clicking Yes will transfer each rack into the selected container. Clicking No will cancel the transfer and take you back to the manage racks screen.
Back to the Online Documentation