Rack and Container Validation
Setting Up a Validation
Opening the Validation Container Selection Screen
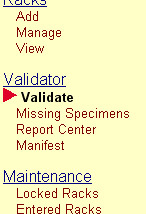
- Click Validate in the Navigation Menu under the heading Validator.
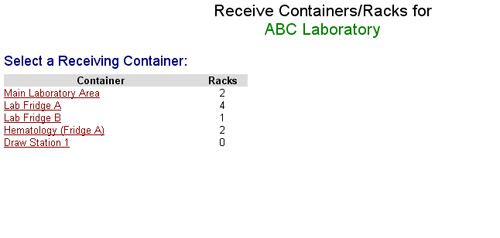
- The Validation Container Selection Screen will be displayed showing a list of containers with the Container Name for each being a clickable link.
Selecting a Specimen Source and a Destination Container
For every validation, specimens are transferred as a rack or container from one container to another. A container receiving the specimens and a rack or container transferring the specimens must be selected before specimens can be validated.
From the Validation Container Selection Screen:
- Click the Container Name Link corresponding to the desired receiving container that will accept the validated rack or container. This selects the destination container.
- The Validation Search Screen will be displayed.
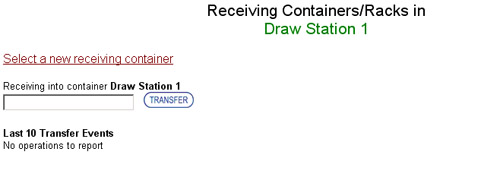
- The Validation Search Screen has four notable sections.
- Screen Header: Displays the operation being performed (Receiving Containers/Racks) in black text and the destination container in green text (Draw Station 1).
- Select a new receiving container Link: Returns to the Validation Container Selection Screen where a different receiving container can be specified.
- Rack and Container Search Area: Contains the Search Text Box where the Rack ID or Container ID being validated will be typed or scanned in and the Transfer Button that will start the search.
- Last 10 Transfer Events List: Displays the last ten transfer events for the currently selected receiving container.
- The Validation Search Screen has four notable sections.
- Ensure that the correct Receiving Container Name is displayed at the top of the screen in green text.
- If the Receiving Container Name displayed is not correct, click the Select a new receiving container Link to return to the Validation Container Selection Screen.
- If the Receiving Container Name displayed is correct, continue on.
- Type or scan a Rack ID or Container ID into the Transfer Text Box. For Rack ID searches, wildcards are permitted. To select a container, the exact Container ID must be entered.
- Click the Transfer Button.
- If the search found only one match for the search term it will automatically select the exact match.
- If the search found multiple matches, a list of the racks matching the search term will be displayed with the Rack ID for each being a clickable link. Click the Rack ID Link corresponding to the desired rack to select it.
- The Validation Screen will be displayed.
Overview of the Validation Screen
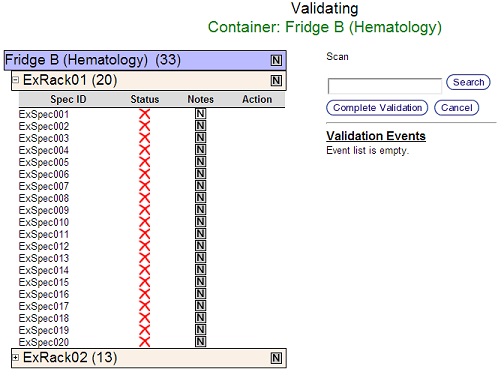
The Validation Screen is where the transfer of specimens, racks, or containers to a receiving container is validated. It is divided into four areas:
 |
Screen Heading
The Screen Heading displays the current action (Validating) in black text and the Container Name (Fridge B (Hematology)) or Rack Name (ExRack01) being validated in green text.
Specimen Listing Area
The Specimen Listing Area lists the Rack or Container of Racks being validated on the left side of the screen.
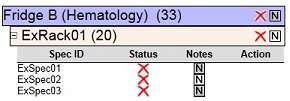 |  |
- Specimens within a rack are displayed as a list with a grey column header. For each specimen, the Specimen ID, Validation Status, Notes, and Performable Actions are displayed.
- Specimen lists are nested under Rack Headers which are tan boxes containing the Rack ID, number of specimens in the rack, a Validation Icon Button (if allowed), and a Note button.
- Rack lists are nested under a Container Header which is a blue box containing the Container Name, number of specimens in the container, a Validation Icon Button (if allowed), and a Note button. A Container Header will only be visible when an entire container has been selected for validation.
- When validating an entire container of racks, the contents of only one rack can be displayed at a given time. When the contents of a rack are being displayed, that rack is considered to be selected. In the example above ExRack01 is selected and being displayed while ExRack02 is therefore neither selected nor being displayed.
- Select a different rack by clicking the plus sign button to the left of the desired rack's Rack ID in a Rack Header. When clicked, the plus sign button will change to a minus sign button indicating that the contents of the newly selected rack are expanded and displayed below.
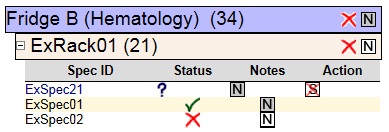
- Specimens, as well as racks and containers when allowed, each have a Validation Icon Button to denote their current validation status.
- A red X icon means the object has not been validated.
- A green check mark icon means the object has been validated.
- A blue question mark icon means the specimen was added to the rack during validation and has not yet been validated. This will be covered more in the
Validating a specimen, rack, or container section.
Validation Entry Area
The Validation Entry Area contains the Search Text Box and Search Button where Specimen IDs will be scanned or typed in for validation and where Rack IDs will be scanned or typed in to switch between racks while validating. It also contains the Complete Validation Button that saves the validation results and the Cancel Button that will cancel any changes and return to the Validation Container Selection Screen.
The Validation Events Area serves one of three purposes at any given time
- Displays the last 10 validation events including validating or adding notes to specimens, racks, or containers.

- Displays the specimen history and current information when a Specimen ID is clicked in the Specimen Listing Area.
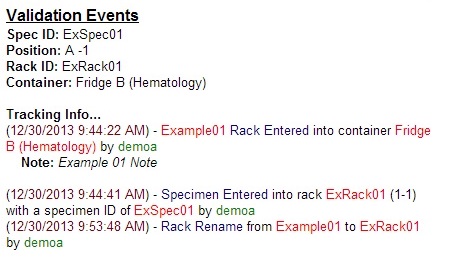
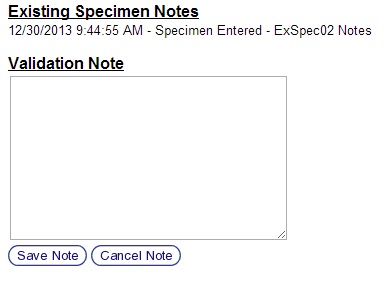
- Displays Validation Note Area when a specimen, rack, or container's Note Icon is clicked. Clicking on the note icon for a specimen, rack or container displays any previously entered notes as well displaying a Validation Note Entry Area in which a validation note can be entered, modified, or deleted.
Validating a specimen, rack, or container
There are several ways in which a specimen can be validated.
Using the Validation Search Text Box
Validating a Rack of Specimens
- Scan or type a Specimen ID into the Search Text Box.
- Click the Search Button or press the Enter Key on the keyboard.
- When validating a single rack, tube.tracker will search the rack for a matching specimen ID.
- If a match is found, the specimen is marked as validated.
- If no match is found and the rack is not at it's capacity, a new specimen is added to the rack using the search term as the Specimen ID.
- The validation status of this new specimen will be marked as New by a blue question mark until the specimen is validated. Click the blue question mark to validate the specimen.
- In the Action column, an icon will appear that is a white square enclosing a black S with a red X covering it. Click this icon to remove the new sample.
- Repeat as necessary to validate all samples.
Validating a Container of Specimens
When validating a container of specimens, the Rack IDs of all of the racks in the container are displayed in their Rack Headers, however, only one rack at a time can be selected to display its specimens for validating. When the Search button is pressed, the search term will be checked differently than when validating a single rack of specimens to anticipate adding new specimens and switching the currently selected rack:
- Scan or type a Specimen ID or Rack ID into the Search Text Box.
- Click the Search Button or press the Enter Key on the keyboard. A search of Specimen IDs is performed on the currently selected rack to determine if there is a matching specimen ID.
- If the search term matches a Specimen ID in the currently selected rack, that specimen will be marked as validated.
- If the search term does not match a Specimen ID in the currently selected rack and it does not match a Rack ID in the container being validated, a new specimen is added to the rack using the search term as the Specimen ID as long as the rack is not at capacity.
- If the search term does not match a Specimen ID in the currently selected rack but it does match a Rack ID in the container being validated, a dialog box will be displayed.
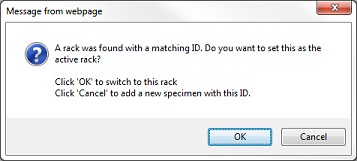
- Click the OK Button to select the rack and display its list of specimens. The previous rack will no longer be selected and its specimens will not be listed.
- Click the Cancel Button to add a new specimen to the rack using the search term as the Specimen ID as long as the rack is not at capacity.
Using the Validation Icon Buttons
Using a Specimen Validation Icon Button
- Click the Validation Icon Button for the specimen being validated.
- The Validation Icon Button will change from a red X to a green check mark indicating the the specimen has been validated.

- Repeat until all available specimens are validated.
Using a Rack or Container Validation Icon Button
Rack and Container Validation Icon Buttons appear in the Rack and Container Headers when allowed by administrators of an institution. If the administrators have enabled the Force Individual Specimen Validation setting, Rack and Container Headers will not appear since each specimen must be validated individually.
 |  |
- Click the Validation Icon Button in a Rack or Container Header.
- The Validation Icon Buttons for both the Rack or Container Header and each listed specimen will change from a red X to a green check mark indicating that all of the specimens have been validated.

Validation Notes
During the validation process, there are many opportunities to add notes to specimens, racks, and containers.
Overview of Validation Notes
The status of a specimen, rack, or container note can be determined by a quick glance its Note icon. The Note icon for a rack or container will appear on the far right of the header. The Note icon for a specimen will appear in the Notes column in the specimen listing. There are four possible note states which can be categorized in two groupings.
- Previous Notes: A specimen, rack, or container will either have notes attached to them previously or they will not. This can quickly be determined by the color of the Note icon.
- Previous note exists: If a note was attached at any point in the past, the note icon will appear as a white square with a black N (See Specimen ExSpec101 Below).
- Previous notes does not exist: If no notes have ever been attached then the note icon will appear as a gray square with a black N (See Specimen ExSpec102 Below).
- Validation Note: A validation note is a note that has been attached to a specimen, rack or container during the current validation. Once the validation is completed, any new notes added during the validation will then be considered a previous note.
- Validation note does not exist: If no validation note has yet been attached, the note icon's appearance will then be determined by their previous notes status.
- Validation note exists: Once a validation note has been attached, the icon's color will be white with a red plus sign in the upper right-hand corner (See Specimen ExSpec103 Below).
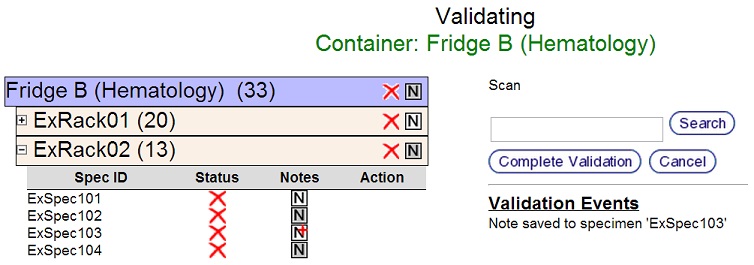
Adding a validation note
- Click on the note icon for a specimen, rack, or container.
- Once the note icon has been clicked, several sections of the screen will change appearance.
- The object receiving the validation note will be highlighted in yellow.
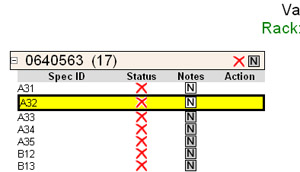
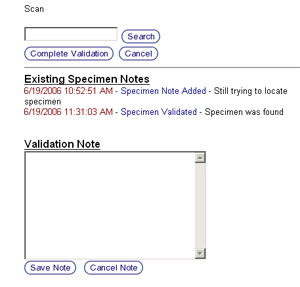
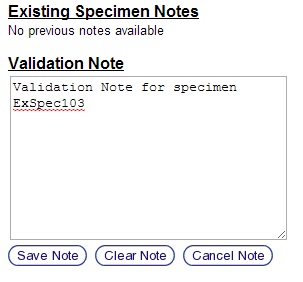
- The Validation Events area will display the Validation Notes Area. If any previous notes are present, they will be shown in the top portion of the area. Below the previous notes section is the Validation Note Text Box.
- The object receiving the validation note will be highlighted in yellow.
- Type a note in the Validation Note Text Box.
- Click the Save Note Button or use the shortcut key Ctrl-Q, to save the note.
View, modify or clear a validation note
After a validation note has been added, it may become necessary to view, make changes to, or remove the note.
- Click the Note icon for the specimen, rack, or container to view the current Validation Note. The current Validation Note will appear in the Note section.
- Viewing validation note: The validation note is currently displayed in the Note section. After viewing it, click the Cancel Note Button to leave the note unmodified.
- Modify validation note: Make the appropriate changes to the note and click the Save Note Button.
- Clearing validation note: The validation note can be cleared by either clicking the Clear Note Button, or deleting the text of the current validation note and clicking the Save Note Button.
Completing the validation process
Once all of the specimens in the rack or container have been validated, the validation can be completed by transferring the rack to the receiving container.
- Click the Complete Validation Button.
- All specimens that were validated will be transferred to the receiving container.
- All specimens that were not validated will automatically be marked as missing and therefore will not be transferred to the receiving rack.
- The Validation Container Selection Screen will be displayed.
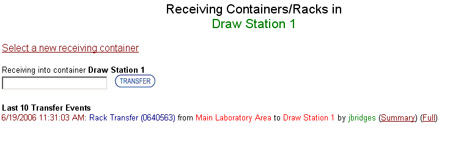
- There will be a new entry in the Last 10 Transfer Events section of the page listing the time of the transfer, what was transferred, and to where it was transferred.
- There will also be two links at the end of the entry that will display the Summary Report and Full Report for the validation. Clicking on either of these links will open a new window/tab in the browser and display the report. The report can then be printed if desired. Refer to the [[Report_Center|Report Center]] for more information on Validation Reports.